Kitchenaid side by side KSRB22FKB02 will not cool ref side well, Coils cleaned,repair man checked freon and added some said that would take care of it but did'nt. Freezer is fine but other side is down to about 44º and will not go down with control unit set on high
- If you need clarification, ask it in the comment box above.
- Better answers use proper spelling and grammar.
- Provide details, support with references or personal experience.
Tell us some more! Your answer needs to include more details to help people.You can't post answers that contain an email address.Please enter a valid email address.The email address entered is already associated to an account.Login to postPlease use English characters only.
Tip: The max point reward for answering a question is 15.
This could be a GREAT TIME to consider
calling in a PROFESSIONAL...
They walk in... pull out the wall plug... pull
out the PC board... Poke the soldering iron at a
BAD (cold solder) joint... BINGO ... all is well.
Mishandling a CIRCUIT BOARD could change
a minor issue to a MAJOR FAILURE... EASY.
There are a couple of REALLY great reasons these
appliances say ...
"NO USER SERVICEABLE PARTS INSIDE"
- Primary: novices & amateurs (where EVERYBODY
real actually started) need to be trained to wear
STATIC Protection... $6 (for a good one, see below).
Could also be a simple PC Board "re-seat"...
if it is done with the POWER ON... the oven gets
ruined.
You really ought consider adding in the
MAKE & MODEL.. You will be rewarded with
much better than scary stories...
If you do manage to get a wrist band... actually
remove POWER... & get that control board (PC)
out... Look at the solder side... Check for soot or
obvious cracks.
Use a really bright light and a jewelers loop.
We can guide you with a solder sucker... good iron,
soldering wick... goggles... burn proof flooring, clothes
and furniture...
But as you start adding up all the costs... and the remote
chance of success...
Would it NOT BE EASIER... to look up a 5 STAR repair
shop... (not my normal recommendation)
I'm just saying... Soldering is not as EASY as it looks.
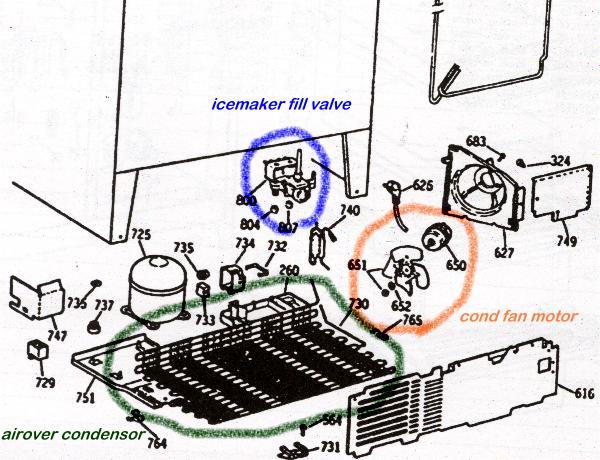
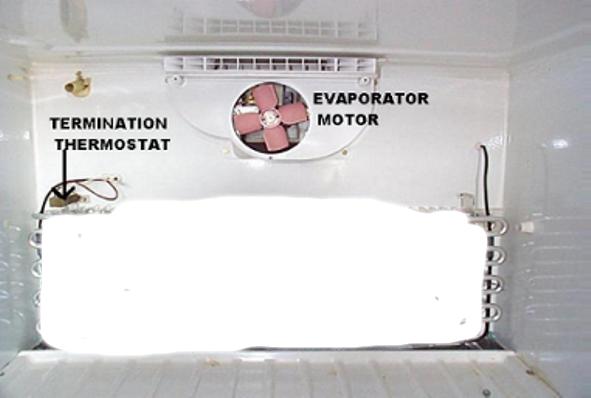
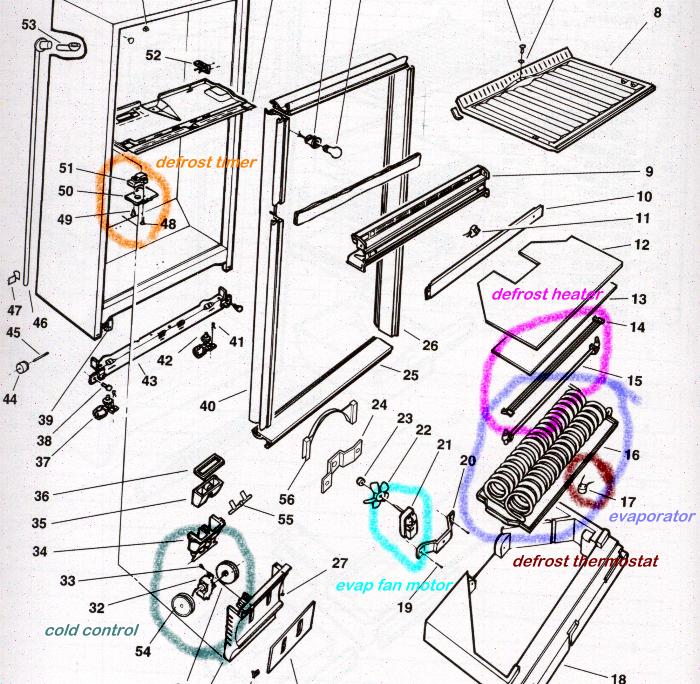
Start out with the easy stuff first...make sure the lights go out when you close the door(s), make sure the doors are closing properly and the gaskets are closing fully and not torn. Check to make sure the evaporator fan in the freezer is working, this fan blows the cold air around. If the fan is not working, possible bad fan motor - check for power to the fan motor and also check the fan switches around the door openings, ( if your fridge has these switches, not all do ). A common problem cropping up in the last several years has been the air damper not opening up and allowing the cold air from the freezer to be blown into the fresh food section ( mostly on SxS refrigerators ). For many years the air damper was manually operated and now we have motorized controlled or temperature controlled or thermistor and electronic boards controlling air dampers, and if this device sticks closed the FF section will normally warm up. An example picture of "one" style and an air damper ( called a diffuser by Whirlpool ). Next would be to check the condenser tubing, a good place to start is to make sure the condenser coils are not built up with dust!! Make sure the condenser fan motor is also working properly. Check for any "clicking on and off" noises from the compressor, is the compressor running. The most common fridge "not cooling" problem is a frost free failure. Remove the access panel in the freezer section to expose the evaporator coils. If the coils in the freezer section get plugged up with frost, this frost will block the evaporator fan motor from blowing the cold air around. The fan blade can also hit this frost and either become noisy or stop altogether. Locating the defrost timer can be tricky....they are often hidden behind the back bottom corners of the fridge at the bottom, in the last few years the timers have been located in the ceiling of the fresh food section, and some behind the cold control cover. Once you locate the defrost timer, slowly turn the screw like wheel in the middle of the defrost timer with a straight screwdriver until the fridge shuts off. You are now in defrost. If the defrost heater(s) comes on now, replace the defrost timer and defrost thermostat. If the heater(s) does not come on, you can ohm test the defrost heater for continuity or volt test for 120 volts to the heater(s). If you have no power to the defrost heater(s) you can also bypass the defrost thermostat to see if the defrost heater will come on, join the 2 wires together to bypass the defrost thermostat. If the heater now comes on, replace the defrost timer and defrost thermostat. If the heater itself is bad, defrost the fridge with a hair dryer, replace the defrost heater* and defrost thermostat. If the defrost timer seems "hot" to the touch or is noisy ( like a ticking or screeching noise )...replace it. Then make sure all the vents are clear and not being blocked by food cartons. One new safety device added to refrigerators in the last few years has been a in-line fuse added to both sides of the defrost heater. If one of these fuses let's go, you must replace the whole defrost heater, as it comes as an assembly. If the defrost heater does not work, you should check for one of these fuses being open. Check it with a volt meter or ohm meter. New link from Appliance Repair Aid on how the wiring circuit works for a frost free fridge, the link is here. On a frost free refrigerator, the cooling coils should be in the freezer section. On a SxS style refrigerator the coils will be behind a cover on the back wall. On a freezer on top style the coils could be behind the back wall or under the freezer floor. Removing the cover and exposing the evaporator coils could be a valuable tool. Seeing what the cooling coils looks like may help split your not cooling problem. Totally covered coils with white snow is a frost free problem. and the rest are bare is an indication of a system problem If you find this helpful, a vote with the thumbs up would be appreciated for the free advice
make sure to check if your refrigerator has power. also check if it is still cooling. if not your refrigerator may be leaking freon (cooling substance used for refs and aircons). If that is the case contact manufacturer or retailer if you still have warranty if you dont contact local repair man.
Hello. W/D here. It should start quickly, provided that it was cooling beforehand. Cleaning the coils should only make it more efficient. If it does not cool, and it did before, look for wires that may have been loosened by the cleaning process. If it was not cooling before the cleaning, there can be a number of reasons. It can be because of low refrigerant, compressor issues or elsewhere. Give it a little time. If it is working, you'll notice the temperature drop in the freezer first. Best regards, --W/D--
A refrigerator has nothing to do with a microwave oven. ? Please explain your issue again. If your refrigerator is not cooling then it is either dirty in the back and you need to vaccum off the coils or it is leaking freon. I would vaccum the back and under side before calling a technician out. Much less costly.
I couldn't find a replacement fuse for my Manning-Bowman coffee maker, so I repaired it. The fuse consists of three parts: the square end pieces and a rectangular connecting piece between them. (They all look like brass.) They're soldered together, and when the pot gets too hot (as it did when I plugged it in before adding water), the solder melts and the connecting piece drops out, shutting off the pot.
To repair the fuse, you'll need solder, a soldering iron, flux, and a small brush. You can get these supplies at a stained glass hobby shop. Leave the end pieces in place and put the connecting piece between them. Brush a little flux on the pieces, heat the solder and put a bead between the connecting piece and each end piece. Let cool and clean it.
You guessed right- it isn't right. I think his price is based on the cost to replace the whole thing minus $100 or $200.
The touchpad is part of a board that may cost some bucks but not likely over $100 and replacing the failed one shouldn't take a blind man more than an hour; there are some housing screws to be removed, some board screws to be removed, one or two connectors to pull and replug on the new board.
If Kitchenaid wants more than $100 for the board, it is because they don't want to fool with repair items at all.
I estimate that the finished board probably costs about $15 when it leaves the assembly line.
They really want you to donate yours to the landfill and buy a new one.


×