At Fixya.com, our trusted experts are meticulously vetted and possess extensive experience in their respective fields. Backed by a community of knowledgeable professionals, our platform ensures that the solutions provided are thoroughly researched and validated.
- If you need clarification, ask it in the comment box above.
- Better answers use proper spelling and grammar.
- Provide details, support with references or personal experience.
Tell us some more! Your answer needs to include more details to help people.You can't post answers that contain an email address.Please enter a valid email address.The email address entered is already associated to an account.Login to postPlease use English characters only.
Tip: The max point reward for answering a question is 15.
If it’s the high pressure side then it will have metal connections on both ends. The rubber hose is the low pressure side. Follow the hose with the metal ends and you’ll find your answer
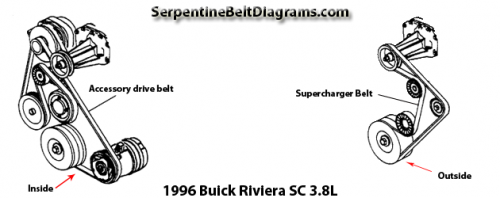
The 1996 Buick Riviera SC has two belts. An inner and an outer belt. The
outer belt is for the supercharger and the inner belt is the drive
accessory belt. Rotate the tensioner pulley (idler) and remove the outer
belt first. The do the same to remove the inner belt. Check all make
pulleys and make sure they are free of any debris or oil.
Install
Route the belt according to the diagram above leaving the tensioner
pulley for last and maintaining tension on the belt with your hand.
Rotate the tensioner pulley enough to slip the belt on. Inspect your
belt and make sure it on correctly before you start to put the outer
belt on. Repeat these steps for the outer belt.
Hope this helps (remember to rate and comment this answer).
GM Astro/Safari 1985-1996 Repair Guide
Power Steering Pump - REMOVAL & INSTALLATION (see
Figures 1, 2, 3, 4, 5, 6 and 7)
Fig. 1: Exploded view of the power steering pump assembly
mounting-2.5L engine
Fig. 2: Exploded view of the power steering pump assembly
mounting-early-model 4.3L engine
Fig. 3: Removing the power steering pump pulley-1985-92
vehicles
Fig. 4: Installing the power steering pump pulley
Fig. 5: Pump pulley removal and installation-1993-96 vehicles
Fig. 6: Exploded view of the power steering pump
mounting-late-model 4.3L engines (1993-96 shown)
Fig. 7: Typical power steering pump hose routing-1996 shown
The following procedure requires the use of the GM Puller tool No.
J-29785-A (1985-92), Puller J-25034-B (1993-96) or equivalent, and the
GM Pulley Installer tool No. J-25033-B or equivalent.
Disconnect the negative battery cable for safety.
For 1996 vehicles, remove the air cleaner assembly for access.
For 1993-96 vehicles, remove the hood latch and the upper fan
shroud.
Release tension and remove the drive belt.
Remove the power steering pump pulley using a suitable puller
tool.
Remove the power steering pump retaining bolts, then reposition
the pump as necessary for access to the hoses.
Position a fluid catch pan under the power steering pump.
Remove the hoses from the power steering pump and drain the excess
fluid into the catch pan.
WARNING
Be sure to cap all openings in the pump hydraulic system to
prevent excessive fluid spillage and the possibility of system
contamination.
Remove the power steering pump from the vehicle.
To install:
Position the pump to the vehicle, then uncap and connect the pump
hoses.
Install the steering pump to the retaining bracket, then secure
using the retaining bolts. Tighten the power steering pump-to-bracket
bolts to 37 ft. lbs. (50 Nm). For 1996 vehicles, tighten the nut to 30
ft. lbs. (41 Nm).
On early-model vehicles where the drive belt is tensioned by pivoting
the power steering pump assembly, do NOT fully tighten the mounting
bolts at this time, since you will just have to loosen them again for
belt installation and adjustment.
Install the pump pulley using the GM Pulley Installer tool No.
J-25033-B or equivalent. Press the drive pulley onto the power steering
pump.
Hand-tighten the pivot bolt, the adjusting bolt and the washer.
Install the drive belt. On early-model vehicles so
equipped, properly adjust the belt tension. For details on belt
installation and tension adjustment.
For 1993-96 vehicles install the upper fan shroud and the hood
latch assembly.
For 1996 vehicles, install the air cleaner assembly.
Connect the negative battery cable.
Refill the power steering reservoir and bleed the power steering
system.
Remove the jackstands and carefully lower the vehicle.
Road test the vehicle, then check and top-off the power steering
fluid.
hope this help (remember rated this post) Good luck.
Place Jack under engine with wood to hold it up. Remove uper engine mount(leave loose in engine compartment. Loosen pulley bolts. Remove belts. Remove alternator bolts and lift out of the way for easy access to power steering bolts. Remove 2 power steering bolts using access holes in pulley. You should be able to accessall of the water pump bolts now by moving things out of the way as you go. The two larger bolts toward the radiator can be accessed through the two holes in the motor mount ( you will need a short socket on a 1/4" drive rachet). You should be able to get the pump off now. Installation is much easier than removal.
Power steering fluid reservoir is built right in to the pump which could be found along one of the pully to your fan belt. The cap is also the dip stick. Good luck
there are two bolts that hold the power steering pump in place that are accesable through the holes in the pulley. If you use a 6" extension and a 1/2" socket you can reach them. this will allow the pump to be removed and hang by the hoses and be out of the way. I was told also to inspect the cam sensor while it is apart because you have to remove the water pump in order to get to it.


×