1992 Honda Prelude Logo

Related Topics:

Posted on Mar 14, 2012

Correct loosening order for f22a1 head - 1992 Honda Prelude

Add Your Answer

×

Uploading: 0%

my-video-file.mp4

Complete. Click "Add" to insert your video. Add

×

Loading...
Loading...

Related Questions:

0helpful
1answer

What's the torque on head bolts for a 2004 Volvo s40

Cylinder head bolts (D4192T2):

Cylinder head bolts are tightened in two stages. There is no need for retightening.
Follow the order as pictured.
Stage 1: Tighten to 30 Nm, Angle tighten to 50° ±4° in one movement without stopping.
Then wait at least three minutes in order for the cylinder head gasket to stabilise.
Stage 2: Completely loosen bolts 1 and 2. Tighten bolts 1 and 2 to 25 Nm. Angle tighten to 213° ±7° in one movement without stopping.
Repeat the Stage 2 for the remaining bolts in the order 3-4, 5-6, 7-8 and 9-10 as illustrated.

screenshot 2023-11-07 at 17.21.04-undefined-undefined-0.png
1helpful
5answers

2003 mitsubishi eclipse 2.4 liter head bolts torque specs

The site that has that information is called alldata and it is not free.
0helpful
1answer

I. Need. Help. With. Cam bolts. And head bolts

Part 1 of 3: Getting to the head bolts

Materials Needed
  • Eye protection
  • Gloves
  • Oil and coolant drain
  • Parts cleaner or brake cleaner
  • Shop rags
  • Socket set and ratchet1: Drain the oil and coolant. Put on your eye protection and gloves and drain the oilfrom the vehicle.
    Make sure the vehicle can not be started by removing the negative cable from the battery. Next the coolant will need to be drained so it does not leak when the head bolts are loosened.
    Step 2: Clean valve cover. Use some of the parts cleaner or brake cleaner to clean up the valve cover and as much of the cylinder head as is reasonable.Remove valve cover. If necessary, remove other components to make the valve covers accessible, and start removing the bolts from the valve cover.
    Once all bolts are removed carefully removed the valve cover from the cylinder head. If any valve cover gasket material remains, remove it at this time and clean any excess oil from the edges. Set the valve cover aside carefully as it will be reused with a new gasket once repairs are completed.

    Part 2 of 3: Pushrod engine head bolt removal

    Materials Needed
    • Head bolt socket (if needed)
    • Numbered cardboard
    • Rubber hammer
    • Socket set and ratchetStep 1: Rocker arm and rocker removal. A pushrod engine has long pushrods that protrude through the cylinder head and attach to the rocker rail.
      The rocket arm will need to be loosened first. Many manufactures have a specific sequence for removal of the rocker arm bolts. After the rocker arm is removed, the rockers will be unbolted.
      Set all rocker arms aside in the order they were removed as they should go back to the cylinder they were removed from.Step 2: Remove the pushrods. Remove the pushrods one at a time from the cylinder head.
      Put them into a numbered piece of cardboard as the pushrods will go back into the same slot they came from.Step 3: Loosen head bolts. Use the ratchet begin to break the cylinder head bolts loose.
      Each bolt will be loosened but not removed. Loosen all of the bolts before removing any of the the bolts all the way.
      Step 4: Remove the bolts. Place each bolt through a numbered hole in the cardboard in case the head bolts are different lengths so they can be installed back into the proper hole.
      The bolts may require a special socket depending on the manufacture.
      Step 5: Lift off the cylinder head. Once all bolts are removed, lift up on the cylinder headgently; the head should come free easilyIf the cylinder head sticks, lightly use a dead blow or rubber mallet to tap the cylinder head to be able to remove it. Set to the side in a safe area.
      • Warning: Cylinder head bolts have a specific sequence that is used when removing them. Consult the manufacturer's specifications for the proper removal sequence for the engine being worked on.

      Part 3 of 3: Overhead cam head bolt removal

      Material Needed
      • Socket set and ratchetStep 1: Remove the timing cover. The timing cover will need to be removed to gain access to the timing belt or chain.
        This is necessary because the cam shaft sits in the cylinder head and is attached to the crankshaft with either a timing belt or timing chain.
        Step 2: Time the engine to remove the belt. The engine will need to be timed to avoid damage when the timing belt is removed.
        Each engine is different and will have its own procedures to time. There should be marks on the camshaft and crankshaft that will be aligned to set the timing at top dead center (TDC)Step 3: Remove the timing belt. The timing belt tensioner will be removed or released to take the tension off the belt.
        Once the belt is loosened, it should be able to be slipped of the camshaft in the cylinder head.Step 4: Remove the head bolts. Every engine will have its own procedures for the order that the head bolts are removed or tightened.
        Loosen head bolts ¼ turn each in the order specified, which may require a special socket. Once all the bolts have been loosened they may be removed one at a time. The bolts must be organized or marked in case they are different lengths.
        Step 5: Remove the cylinder head. Once all the bolts are removed, the cylinder head may be removed from the engine. If it is stuck, tap lightly on the side of the head with a rubber hammer to loosen the cylinder head.
        • Warning: Most head bolts are torque-to-yield. These head bolts are single use only and once removed must be replaced. Torque-to-yield head bolts stretch when they are torqued to allow them to tighten properly and repeated application can cause the head bolt to break.
        Removing the head bolts can seem like a daunting process
0helpful
1answer

Torque spec for stator bolt on 1982 Honda cm450e

This information may be in the site already. May help but for 92 year spec's. Check the following link:

Head torque specs for 92 honda accord with f22a1
0helpful
2answers

What is the cylinder head bolt torque settings fir a 4g69 mitsubishi engine ?

BOLT INSTALLATION


Apply engine oil to the thread of the bolts and to the washers.
Tighten the bolts to the specified torque, using the tightening sequence shown.
Tightening torque: 54 ft-lb +/- 2 ft-lb
Loosen all bolts fully in the reverse order of tightening.
Re-tighten the loosened bolts to the specified torque in the tightening sequence shown.
Tightening torque: 15 ft-lb +/- 1 ft-lb
This step is to make it easier to ensure you are making 90 degree turns. Make a paint mark across each bolt head and cylinder head.
Tighten the cylinder head bolts 90 degrees in the specified order.
Tighten the bolts another 90 degrees in the specified order and check that the paint marks on the cylinder head bolts are aligned with the paint marks on the cylinder head.
Link to the guide for this engine: http://www.mivec.co.nz/tech/4G9x_Engine_Manual.pdf


0helpful
1answer

I changed the head gasket on my 92 honda accord with the f22a1 and its not gitting fuel now

I hate to have to say this, like a 9-mile long skid of nails on the chalk board -- But -- are you Absolutely positively certain ((with no doubt what so ever)) that the head gasket was not inverted when replaced? Some vehicles have tiny holes which may need alignment..
Are you certain it is not getting fuel? have you tested the fuel pump?Certain no wires (such as to the fuel pump) were not re-hooked up again?
Alternatively, it is always possible an electrical wire to an injector could have gotten pinched/ shorted. Carefully re-inspect **EVERYTHING** -- *PIECE - BY - PIECE* first, Take plenty of time to be as thorough as possible on a re-inspection before ripping this puppy back apart again...
Best regards
Ck
Please provide feedback ratings
1helpful
2answers

Hi i'm eduardo and i have a '94 nissan pathfinder 4wd...engine 3.0.... i want to know the head torque specifications .

Hi Eduardo:
Check this information (click over pics for zoom)...

zjlimited_1062.jpg

Fig. 20: Exploded view of the cylinder head assembly-VG30E engine


zjlimited_1063.jpg

Fig. 15: Cylinder head loosening sequence-VG30i and VG30E engines


zjlimited_1064.jpg

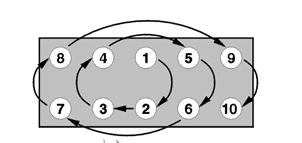
Fig. 17: Cylinder head torque sequence-VG30i and VG30E engines


Install the cylinder head with a new gasket. Apply clean engine oil to the bolt threads and seats, then install the bolts with washers (beveled edges up) in the correct position. Note that bolts 4, 5, 12 and 13 measure 5.00 in. (127mm), and are longer than the others. The other bolts are 4.17 in. (106mm) long.

Tighten the bolts in the proper sequence, in the following stages:
Tighten all bolts, in order, to 22 ft. lbs. (29 Nm).
Tighten all bolts, in order, to 43 ft. lbs. (59 Nm).
Loosen all bolts completely.
Tighten all bolts, in order, to 22 ft. lbs. (29 Nm).
Tighten all bolts, in order, to 40-47 ft. lbs. (54-64 Nm). Or, if you have an angle torque wrench available, tighten them an additional 60-65 degrees.


Hope this helps; remember to rate this answer. Good luck.
0helpful
1answer

Torque for head for a 2.5 for an 1985 Buick Skylark

Loosen Headbolts in this order:

1 5 4
3 6 2

Tighten Headbolts in this order:

3 1 6
5 2 4

Following the tightening order, torque Head Bolts as following:

1. Torque All to 22 Ft Lbs
2. Torque all to 51 Ft Lbs
3. Loosen all 180 degrees
4. Loosen all 180 degrees
5. Torque Center Two bolts to 25 Ft Lbs
6. Torque Outer 4 bolts to 11 Ft Lbs
7. Tighten all bolts 90 degrees
8. Tighten all bolts 90 degrees again

Make sure you tighten all of them down the first 90* and then go back and tighten them another 90*. Also make sure you put some lube between the bolt and the washer, and put some sealant on the bolt threads. Use GM Thread Sealant.
2helpful
2answers

I need to find the torque specs for the connecting piston rod? also the sequence and torque for the cylinder head bolts this is for a kia rio 2004 6cyl

22 - 24 ft. lbs. for the rod caps and....
110795143Cylinder Head Tightening Torque and Sequence.

Tighten cylinder head bolts in order shown.
Tightening torque: 36.1 ft. lbs. (49 Nm, 5 kg-m)

Loosen bolts in reverse of order shown.

Retighten cylinder head bolts in order shown.
Tightening torque: 18 ft. lbs. (25 Nm, 2.5 kg-m)

Mark cylinder head bolts for rotational reference.
Rotate cylinder head bolts 90°(1/4 Turn) in order shown.

CAUTION:
  • Do not reuse the old cylinder head bolts.
0helpful
1answer

I have a audi i cant put the surpentine belt back in

Click on the following Direct Link. I know you said Serpentine (correct spelling) Belt and this Link has Timing Belt; however this does have the Serpentine Belt Diagram and also some key instructions to putting it back-on. After going to the Link, scroll down the page (to about half-way down the page) to Diagrams: G00039904, then G50H16367, then G50J16369.
In Diagram G00039904: it has the "Hinged Mounting Bracket" which has the Pulley holding tension on the belt keeping it tight. This must be loosened (NOT REMOVED) in order to get a serpentine belt back on. Then re-tightened in order to have the correct amount of tension.
In Diagram G50J16369: this Hinged Mounting Bracket has Mounting Bolts which again must be loosened (NOT REMOVED) in order for the hinge mounting bracket to move - loosening the Pulley = loosening the Serpentine Belt.
There are a couple of additonal Diagrams regarding the Electric Fan Mounting Bolts etc., that are useful for your reinstallation.

Let me know if this helped, or if you have additional information or questions. Feel Free to contact me at FixYa.com!
http://www.2carpros.com/car_repair_information/year/1990/make/audi/model/v8_quattro/1990_audi_v8_quattro_timing_belt_diagram_marks.htm
Not finding what you are looking for?

73 views

Ask a Question

Usually answered in minutes!

Top Honda Experts

ZJ Limited
ZJ Limited

Level 3 Expert

17989 Answers

Thomas Perkins
Thomas Perkins

Level 3 Expert

15088 Answers

john h

Level 3 Expert

29494 Answers

Are you a Honda Expert? Answer questions, earn points and help others

Answer questions

Manuals & User Guides

Loading...