
Is the compressor running continuously, or clicking on and off, or not running at all?
Testimonial: "Clicking on and off."
Clicking on and off.
I have a Frigidaire ffhs2311pfba refrigerator that started beeping, has an HI code, the freezer and fridge side are too warm and the water to the cubes and dispenser not working. Compressor clicks on and off.
Either relay and overload that plugs into side of compressor is bad or compressor itself is shorted out. I would try replacing the relay / overload
I have a Frigidaire ffhs2311pfba refridgerator that started beeping, has an HI code, the freezer and fridge side are too warm and the water to the cubes and dispenser not working. How would that start relay affect the lack of water to the cubes and dispenser?
Ice maker doesn't work unless freezer is near 0F.
×
My frigidaire ffhs2311pfba freezer is leaking water to the bottom of the freezer. Once frozen it will start to leak outside the freezer. I cleaned off the ice maker but not the post behind it as it is frosted over. Could this be the problem? Or the fan in the back of the freezer?
SOURCE: Jenn Air Side by Side Refridgerator
You could have a layer of solid ice at the bottom of your icetray which is binding everything up. Remove ice tray and any ice from the bottom. Reinstall and be careful of the connection on the back of the ice tray, you may have to turn it a little to get it to mesh correctly. refill and try. Good luck.
SOURCE: Fridge too warm: makes ice, does'nt dispense it: dispenses water warm
I know that it is new but this might be your problem
My fridge is
running but not cold enough: Start out with the easy stuff first...make sure
the lights go out when you close the door(s), make sure the doors are closing
properly and the gaskets are closing fully and not torn. Check to make sure the evaporator fan in the freezer
is working, this fan blows the cold air around. If the fan is not working,
possible bad fan motor - check for power
to the fan motor and also check the fan switches
around the door openings, ( if your fridge has these switches, not all do ). A
common problem cropping up in the last several years has been the air damper
not opening up and allowing the cold air from the freezer to be blown into the
fresh food section ( mostly on SxS refrigerators ). For many years the air
damper was manually operated and now we have motorized controlled or
temperature controlled or thermister and electronic boards controlling air
dampers, and if this device sticks closed the FF section will normally warm up.
An example picture of "one" style and an air damper (
called a diffuser by Whirlpool ). Next would be to check the condenser tubing,
a good place to start is to make sure the condenser
coils are not built up with dust!! Make sure the condenser fan
motor is also working properly. Check for any "clicking on
and off" noises from the compressor, is the compressor running.
The most common
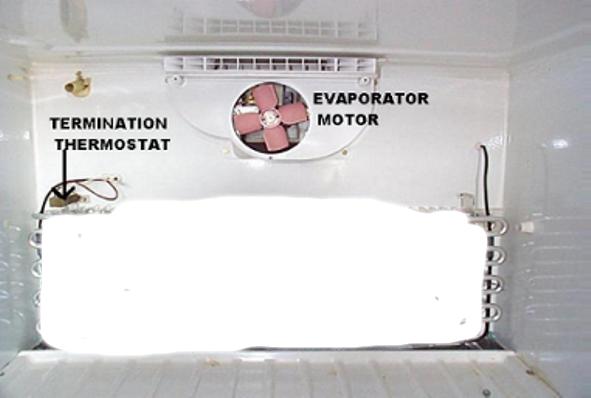
fridge "not cooling" problem is a frost free failure. Remove the
access panel in the freezer section to expose the evaporator coils. If the
coils in the freezer section get plugged up with frost,
this frost will block the evaporator fan motor from blowing the cold air
around. The fan blade can also hit this frost and either become noisy or stop
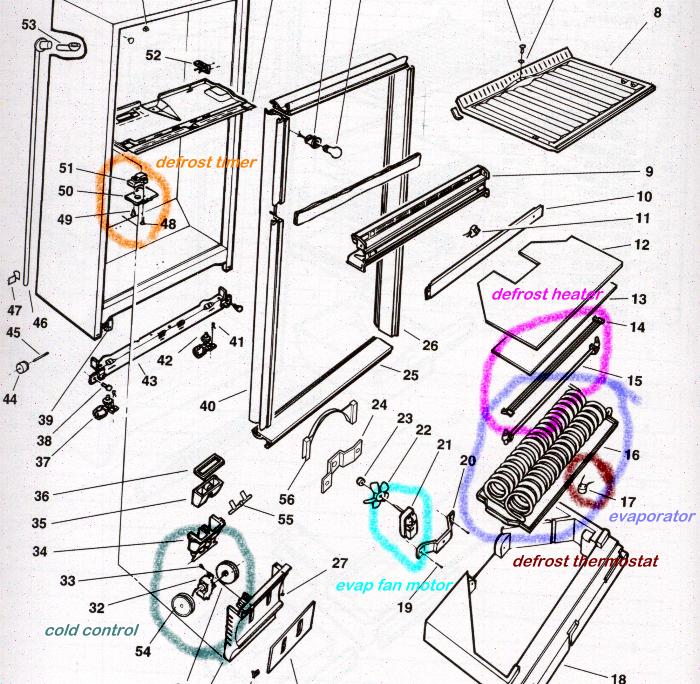
altogether. Locating the defrost timer
can be tricky....they are often hidden behind the back bottom corners of the
fridge at the bottom, in the last few years the timers have been located in the
ceiling
of the fresh food section, and some behind
the cold control cover. Once you locate the defrost timer, slowly turn the
screw like wheel in the middle of the defrost timer with a straight
screwdriver until the fridge shuts off. You are now in defrost. If the defrost
heater(s) comes on now, replace the defrost timer and defrost
thermostat. If the heater(s) does not come on, you can ohm
test the defrost heater for continuity or volt
test for 120 volts to the heater(s). If you have no power to the defrost
heater(s) you can also bypass the defrost thermostat to see if the
defrost heater will come on, join the 2
wires together to bypass the defrost thermostat. If the heater now
comes on, replace the defrost timer and defrost thermostat. If the heater
itself is bad, defrost the fridge with a hair dryer, replace the defrost
heater* and defrost
thermostat. If the defrost timer seems "hot" to the touch
or is noisy ( like a ticking or screeching noise )...replace it.
Since it is new, you should have a warranty and I would see if a repairman can check it free of charge before attempting anything, I don't know your skill level with this type of machine but good luck and don't forget to rate this post, Have a Great Day!
SOURCE: Frigidaire Gallery Series Side by Side doesn't crush ice
hi there,
could be that the ice maker arm is getting stuck or may have some frost on it. can you supply the complete model # please?
SOURCE: Hi, I have a side-by-side fridge/freezer. The
HI, you will need to inspect the compressor to make sure it is cycling in intervals. if the compressor is not cycling, this will confirm compressor failure. The evaporator fan blows cold air into the freezer and from there it vents into the refrigerator. Occasionally the vents between the freezer and refrigerator can become clogged with ice, food or other debris. In most refrigerators the cold control for the refrigerator opens and closes these vents. That mechanism may become inoperative resulting in the vents becoming stuck open or closed.
Inspect the vents to determine what is preventing the free flow of air. An overcrowded refrigerator or freezer may be the cause. In other cases the vents may need to be cleaned or ice melted away. To remove a build up of ice, use a hair dryer set to "low". Using a higher setting may damage the freezer. WARNING: Do not let melting ice drip onto the hair dryer. In some models, the vent is located under the temperature control console. The housing either snaps into place or is held in place with screws. Remove the screws, or gently depress the retaining clips with a small screwdriver. Allow the housing to hang by its wiring. A freezer vent control may also have to be removed to access the vent. In some freezer-on-top models, it may be necessary to remove the floor of the freezer to inspect for obstructions.
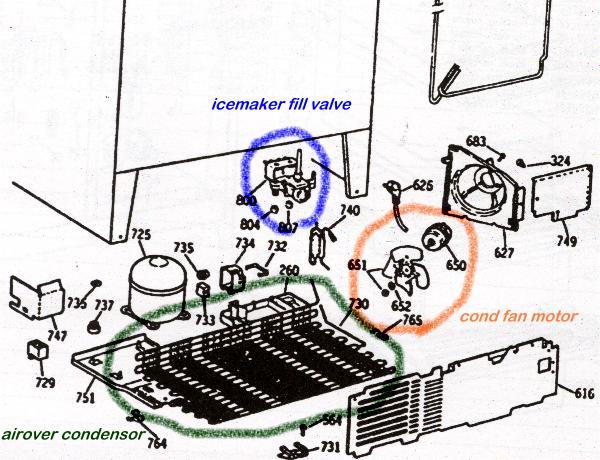
The condenser coils dissipate heat. If dust and debris accumulate around the coils, your refrigerator may not be able to cool properly, it may run continuously or it may stop completely as a result of an overheated compressor. You should clean rear-mounted coils once a year. Unplug the refrigerator before cleaning. Refrigerators are heavy, never tip one forward or backward. Never attempt to move a refrigerator without an assistant. Vacuum or brush the coils. If coils have a filmy build-up, use warm soapy water to clean them. Take care not to spill or drip water onto the components of the refrigerator.You should clean floor level coils at least twice a year. Unplug the refrigerator before cleaning. Vacuum or brush the coils. Remove the grill from the front of the refrigerator and use a vacuum with a wand attachment to remove any dust and debris. The grill should snap off and on. Pull firmly toward you and possibly upward to remove the grill. If it does not come off with a modest effort, check for screws or retaining clips that may hold it in place.
Another inspection point will be the door seals. This is a easy way for the cold air to escape from your unit as well. thsi will cause the temperature to rise. The seal should make smooth continuous contact with the refrigerator case. When the seal does not seal completely, warm air enters the appliance. This results in more frequently compressor operation and possibly the inability of the appliance to maintain proper temperature. To test the seal, use the dollar bill test. Place a a dollar bill or a piece of paper between the seal and the refrigerator and close the door. Now pull the paper out. You should feel tension as you pull. Retest along the entire door seal. Replace the seal if the test was unsuccessful.
Next will be the door switch. The interior light in most refrigerators, and the fan in some, are controlled by a door switch. When the door is closed, the switch is depressed and the interior light goes off and the fan resumes normal operation. If the door is misaligned or the switch malfunctions, the refrigerator may become warm as a result of the non-operation of the evaporator fan and the heat generated by the interior light. Test the switch for continuity using a multimeter. Set the multimeter to the ohms setting X1. Place a probe on each terminal. The multimeter should change from a reading of infinity to zero when the probes touch the terminals. With the probes still touching the terminals depress the switch, the reading should change back to infinity. If it does not pass both of these tests, the switch should be replaced.
Be sure to confirm evaporator fan function as well. if the fan is defective, it will prevent proper cooling as well.
This will conclude the most common issue with a under preforming unit. I would advise to check all the above and, if the unit continues to not cool after all the above adjustments are made, i will recommend replacing the cold control device,thermostat and main circuit board.
CONCERNING YOUR WATER FLOW ISSUE
First, you will need to check the lines inside the unit for ice build-up. if the lines are not frozen, this will lead to a failed inlet valve. Additionally, check the filter(IF EQUIPPED). If the filter has not been changed in a while, it may have reached its filtering limit. if so, this will stop the normal flow of fluids threw the dispenser assembly. replace the filter, if needed. if the filter is not an issue, kindly move on to the valve inspection.
The water inlet valve is located behind your refrigerator. Find the water supply line coming into the valve and turn it off at the source (typically under the sink). Disconnect the supply line. Remove the screws that secure the inlet valve in place.
The water inlet valve is connected by two wires. Label the wire placement on the water inlet valve before disconnecting the wires. The wires are connected to the terminals with slip on connectors
Firmly pull the connectors off of the terminals (do not pull on the wire). You may need to use a pair of needle-nose pliers to remove the connectors. Inspect the connectors and the terminals for corrosion. If the connectors are corroded they should be replaced.
Inspect the filter screen where the supply line connects. Remove any debris or deposits that may have built up using a toothbrush, or warm running water. If you cannot clear the clog, it will be necessary to replace the valve (the filter is not removable on most inlet valves).
Test the water inlet valve for continuity using a multimeter. Set the multimeter to the ohms setting X100 (if available, otherwise use the nearest ohm setting). Place a probe on each terminal. The multimeter should display a reading of 200 to 500 ohms. Close inspection of the inlet valve and especially the coil may reveal the exact ohm resistance rating to test for. If the water inlet valve does not pass this test, it should be replaced.
1,490 views
Usually answered in minutes!


×