Equity Time USA 31215 Wireless Outdoor Thermometer Logo

Related Topics:

B
Bernard Oakes Posted on Dec 10, 2015

I have experienced problems with it: Unable to: (1) Obtain outdoor temperature, (2) Turn off beeping, (3) and have extreme difficulty in setting other data. Please advise appropriate action.

Thank you Bernard Oakes [email protected]

Add Your Answer

×

Uploading: 0%

my-video-file.mp4

Complete. Click "Add" to insert your video. Add

×

Loading...
Loading...

Related Questions:

0helpful
1answer

H4 error code is shown on AC display what can i do to slove this problem

Full list of Gree Air Conditioner Mini Split Units Fault Codes. When error codes appear on the Gree air conditioner indoor display, this tells the user there is an issue with the Gree AC unit. The error code displayed will inform you of the issue or problem that is occurring with the air conditioner. Knowing what the error code means and its definition will help you to understand and troubleshoot the exact Gree air conditioner part that needs to be fixed, cleaned, repaired, or replaced. You can then clean, fix, or replace the Gree part yourself and save money. See below for all error codes that can occur on Gree Mini Split AC's.
Gree Mini Split Air Conditioner Error Codes - How To Fix
Gree Viero AC Mini Split PDF Owners and Troubleshooting Manual
GREE DUCTLESS AIR CONDITIONING & HEATING SYSTEM INSTALLATION MANUAL

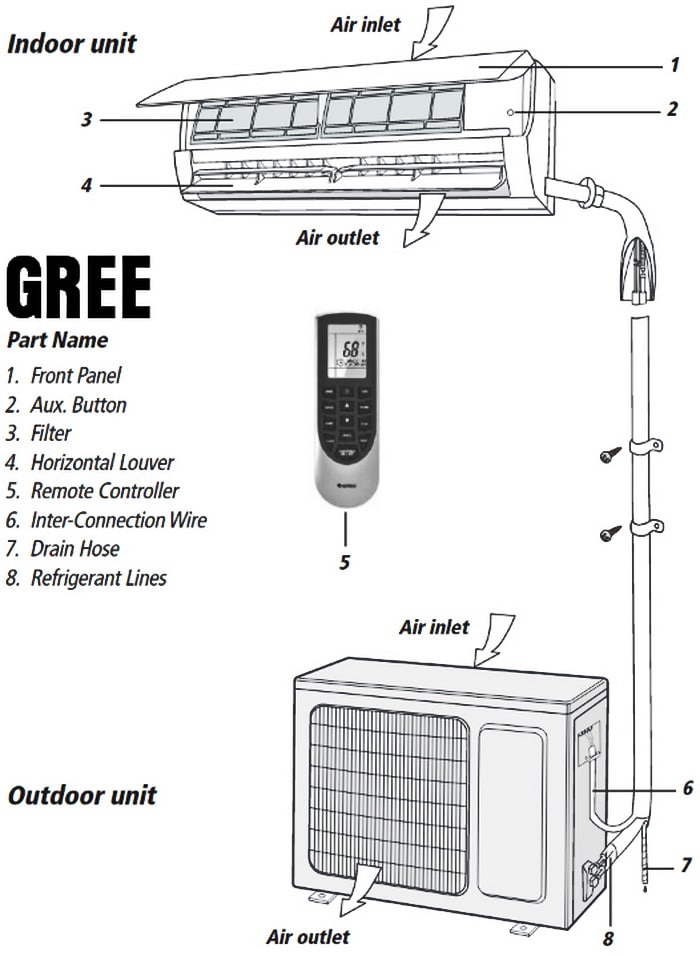
Gree Mini Split Air Conditioner Part Names and Locations
INDOOR AND OUTDOOR UNIT

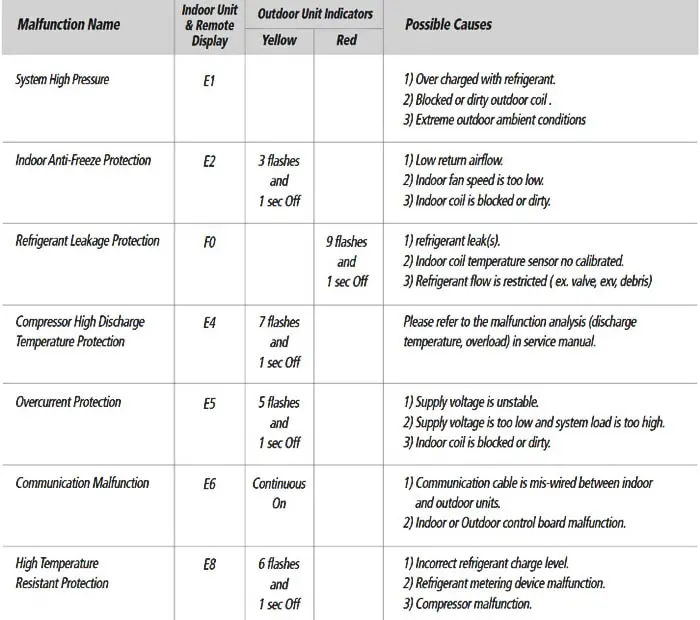
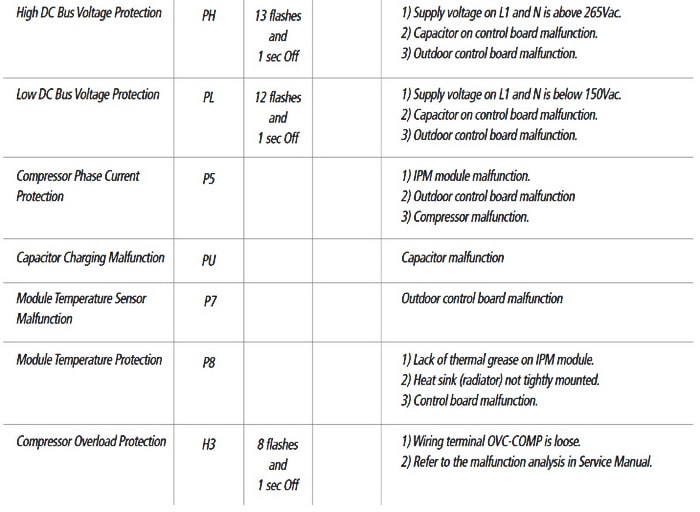
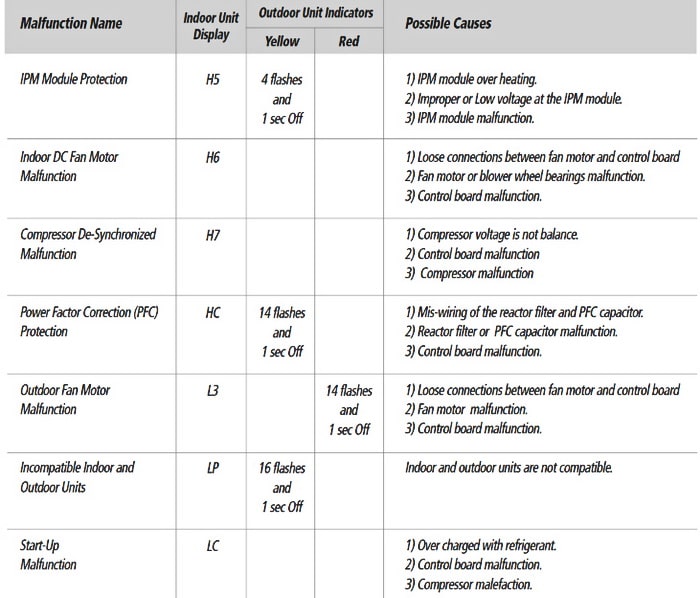
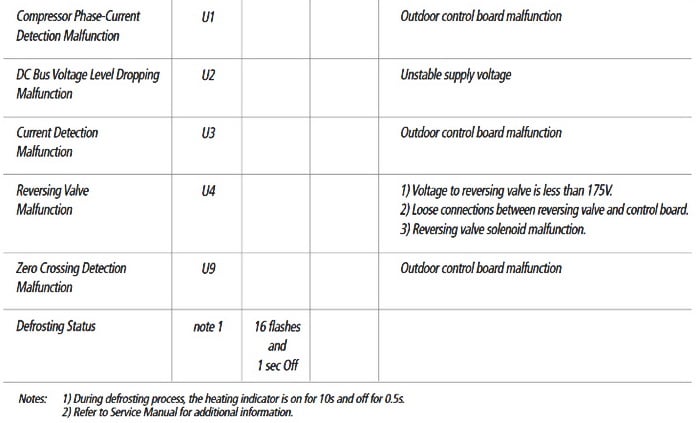
The Gree Air Conditioning Vireo System has onboard error code diagnostics. The outdoor unit will provide status indicators and the indoor wall unit and remote control will display error codes. The following is a summary of the codes with explanations...
GREE AC DIAGNOSTIC ERROR CODES
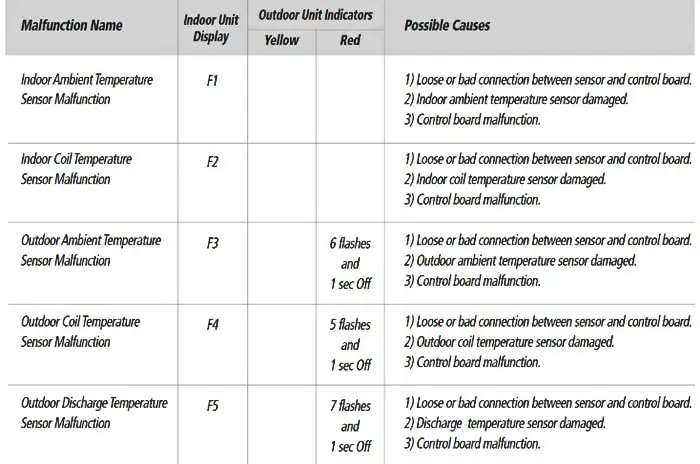
Gree Vireo Mini Split Air Conditioner Error Code F0
Refrigerant Leakage Protection
1) Refrigerant leak(s).
2) Indoor coil temperature sensor not calibrated.
3) Refrigerant flow is restricted (ex. valve, exv, debris)
Outdoor Unit Red Light Indicator - 9 flashes and 1 sec Off
Gree Vireo Mini Split Air Conditioner Error Code E1
System High Pressure
1) Over charged with refrigerant.
2) Blocked or dirty outdoor coil.
3) Extreme outdoor ambient conditions
Gree Vireo Mini Split Air Conditioner Error Code E2
Indoor Anti-Freeze Protection
1) Low return airflow.
2) Indoor fan speed is too low.
3) Indoor coil is blocked or dirty.
Outdoor Unit Yellow Light Indicator - 3 flashes and 1 sec Off

Gree Vireo Mini Split Air Conditioner Error Code E4
Compressor High Discharge Temperature Protection
Please refer to the malfunction analysis (discharge temperature, overload) in service manual.
Outdoor Unit Yellow Light Indicator - 7 flashes and 1 sec Off
Gree Vireo Mini Split Air Conditioner Error Code E5
Overcurrent Protection
1) Supply voltage is unstable.
2) Supply voltage is too low and system load is too high.
3) Indoor coil is blocked or dirty.
Outdoor Unit Yellow Light Indicator - 5 flashes and 1 sec Off
Gree Vireo Mini Split Air Conditioner Error Code E6
Communication Malfunction
1) Communication cable is wired incorrectly between indoor and outdoor units.
2) Indoor or Outdoor control board malfunction.
Outdoor Unit Yellow Light Indicator - Continuous On
Gree Vireo Mini Split Air Conditioner Error Code E8
High Temperature Resistant Protection
1) Incorrect refrigerant charge level.
2) Refrigerant metering device malfunction.
3) Compressor malfunction.
Outdoor Unit Yellow Light Indicator - 6 flashes and 1 sec Off
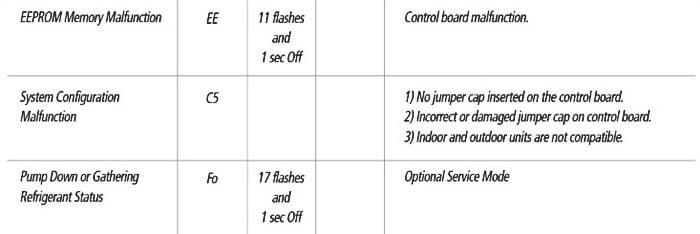
Gree Vireo Mini Split Air Conditioner Error Code EE
EEPROM Memory Malfunction
Control board malfunction.
Outdoor Unit Yellow Light Indicator - 11 flashes and 1 sec Off
Gree Vireo Mini Split Air Conditioner Error Code C5
System Configuration Malfunction
1) No jumper cap inserted on the control board.
2) Incorrect or damaged jumper cap on control board.
3) Indoor and outdoor units are not compatible.
Gree Vireo Mini Split Air Conditioner Error Code Fo
Pump Down or Gathering Refrigerant Status
Optional Service Mode
Outdoor Unit Yellow Light Indicator - 17 flashes and 1 sec Off

NOTE: All of the Gree Air Conditioner Model Numbers below are applicable for the error codes on this page...
Gree AC Vireo Models: VIR09HP115V1A, VIR12HP115V1A, VIR09HP230V1A, VIR12HP230V1A, VIR18HP230V1A, VIR24HP230V1A, VIR30HP230V1A, and VIR36HP230V1A.
Gree Mini Split Air Conditioner Error Code Charts
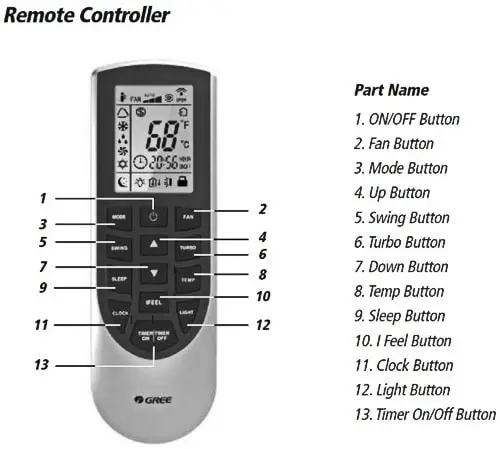
Gree Mini Split AC Remote Control Button Names
Gree Mini Split AC Remote Control Icons Display Screen

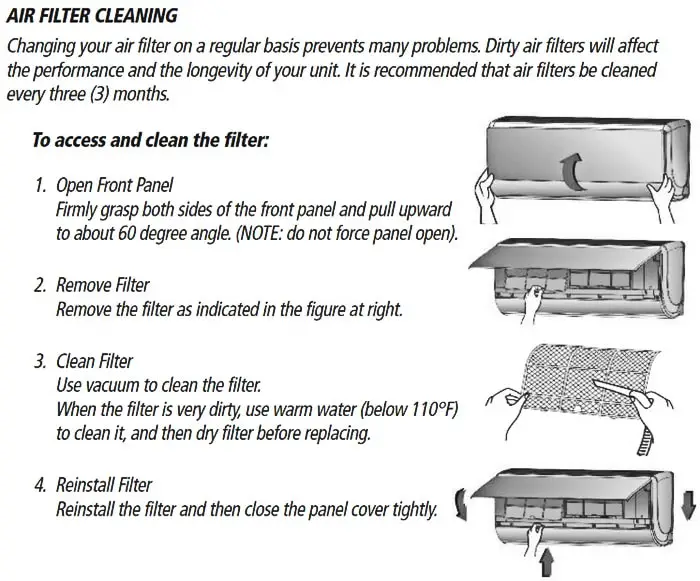
Gree Mini Split Air Conditioner Air Filter Cleaning Procedure
Gree Viero AC Mini Split PDF Owners and Troubleshooting Manual
GREE DUCTLESS AIR CONDITIONING & HEATING SYSTEM INSTALLATION MANUAL
Need help with error codes on your Gree AC? Please leave a question below and we will be happy to help.
0helpful
1answer

How do I get the fault codes up on a Panasonic split air conditioning system CUE24FKR

14.2.2 To Make a Diagnosis1 Timer LED starts to blink and the unit automatically stops the operation.
2 Press the CHECK button on the remote control continuously for 5 seconds.
3 "- -" will be displayed on the remote control display.
Note: Display only for "- -" (No signal transmission, no receiving sound and no Power LED blinking)
4 Press the TIMER ? or ? button on the remote control. The code "H00" (no abnormality) will be displayed
and signal will be transmit to the main unit.
5 Each press of the button (? or ?) will increase error code
number and transmit error code signal to the main unit.
6 When the latest abnormality code on the main unit and
code transmitted from the remote control are matched,
Power LED will light up for 30 seconds and a "beep" sound
(continuously for 4 seconds) will be heard. If no codes are
matched, Power LED will light up for 0.5 seconds and no
sound will be heard.
7 The breakdown diagnosis mode will be canceled unless
pressing the CHECK button continuously for 5 seconds or
operating the unit for 30 seconds.
8 The LED will be off if the unit is turned off or the RESET
button on the main unit is pressed.
Diagnosis
display Abnormality / Protection control Abnormality
Judgement Emergency operation Primary location to verify H00 No abnormality detected - Normal operation H11 Indoor / Outdoor abnormal communica
tion > 1 min after starting
operation Indoor fan operation
only • Internal / external cable connections
• Indoor / Outdoor PCB H14 Indoor intake air temperature sensor
abnormality Continue for 5 sec. - • Intake air temperature sensor (detec
tive or disconnected) H15 Outdoor compressor temperature sensor
abnormality Continue for 5 sec. - • Compressor temperature sensor
(detective or disconnected) H16 Outdoor Current Transformer open cir
cuit - - • Outdoor PCB
• IPM (Power transistor) module H19 Indoor fan motor mechanism locked 7 times occurance
continuously - • Indoor PCB
• Fan motor H23 Indoor heat exchanger temperature sen
sor abnormality Continue for 5 sec. O
(Cooling only) • Heat exchanger temperature sensor
(detective or disconnected) H24 Indoor heat exchanger temperature sen
sor 2 abnormality Continue for 5 sec. - • Heat exchanger temperature sensor
(detective or disconnected) H27 Outdoor intake air temperature sensor
abnormality Continue for 5 sec. O • Outdoor temperature sensor (detec
tive or disconnected) H28 Outdoor heat exchanger temperature
sensor abnormality Continue for 5 sec. O • Outdoor heat exchanger temperature
sensor (detective or disconnected) H30 Outdoor discharge air temperature sen
sor abnormality Continue for 5 sec. - • Outdoor temperature sensor (detec
tive or disconnected) H33 Indoor / Outdoor wrong connection - - • Indoor / Outdoor supply voltage H38 Indoor / Outdoor mismatch (brand code) H50 Ventilation motor abnormality 7 times occurance
continuously - • Indoor PCB
• Ventilation motor H51 Nozzle lock abnormality 2 times occurance
continuously - • Nozzle H52 Limit switch abnormality - - • Indoor PCB H97 Outdoor fan motor mechanism locked 2 times occurance
within 30 minutes - • Indoor PCB
• Fan motor H98 Indoor high pressure protection - - • Air filter dirty
• Air circulation short circuit H99 Indoor heat exchanger anti-freezing pro
tection - - • Insufficient refrigerant
• Air filter dirty F11 Cooling / Heating cycle changeover
abnormality 4 times occurance
within 30 minutes - • 4-way valve
• V-coil F90 PFC control 4 times occurance
within 10 minutes - • Voltage at PFC F91 Refrigerantion cycle abnormality 2 times occurance
within 20 minutes - • No refrigerant
(3-way valve is closed) F93 Compressor rotation failure 4 times occurance
within 20 minutes - • Compressor F95 Cool high pressure protection 4 times occurance
within 20 minutes - • Outdoor refrigerant circuit F96 IPM (power transistor) overheating pro
tection 4 times occurance
within 30 minutes - • Excess refrigerant
• Improper heat radiation
• IPM (Power transistor) F97 Outdoor compressor overheating protec
tion 4 times occurance
within 10 minutes - • Insufficient refrigerant
• Compressor F98 Total running current protection 3 times occurance
within 20 minutes - • Excess refrigerant
• Improper heat radiation F99 Outdoor Direct Current (DC) peak detec
tion 7 times occurance
continuously - • Outdoor PCB
• IPM (Power transistor)
• Compressor

Note:
"O" - Frequency measured and fan speed fixed.
The memory data of error code is erased when the power supply is cut off, or press the Auto Switch until "beep" sound heard following by pressing the "CHECK" button at remote controller.
Although operation forced to stop when abnormality detected, emergency operation is possible for certain errors (refer to Error Codes Table) by using remote controller or Auto Switch at indoor unit. However, the remote controller signal receiving sound is changed from one "beep" to four "beep" sounds.
0helpful
1answer

Lacrossetechnology

Hi Susuan,
One of these methods below should get your device working properly. Good luck!
LaCorosse Tech Support email address.
The product information page
From the manual:
915MHz RECEPTION CHECK FOR OUTDOOR TEMPERATURE SENSOR
The atomic clock will receive the temperature data within 3 minutes. If the temperature data is not being received 3 minutes after setting up (the display shows "- - -"), then please check the following points:
1. The distance of the atomic clock or outdoor temperature sensor should be at least 6 feet (2meters) away from any interfering sources such as computer monitors or TV sets.
2. Avoid placing the receiver onto or in the immediate proximity of metal window frames.
3. Using other electrical products such as headphones or speakers operating on the same signal frequency (915MHz) may prevent correct signal transmission and reception.
4. Neighbors using electrical devices operating on the 915MHz signal frequency can also cause interference.
Note:
When the 915 MHz signal is received correctly, do not re-open the battery cover of either the outdoor temperature sensor or atomic clock, as the batteries may spring free from the contacts and force a false reset. Should this happen accidentally then reset all units (see Setting up above) otherwise transmission problems may occur.
The maximum transmission range is 330 feet (100 meters) from the outdoor temperature sensor to the atomic clock (in open space). However, this depends on the surrounding environment and interference levels. If no reception is possible despite the observation of these factors, all system units have to be reset (see Setting up).
0helpful
1answer

I am having difficulty setting up my TimerMax XT and note that there are no detailed instructions in the package. Are there some instructions on line? John

I can't find online instructions.
I did find that you can only set ON and OFF times on the hour, if that is any help.
Other owners claim that it is very easy to set.
Good Luck.
0helpful
1answer

Unable to locate the manual, how do I program the timer to turn on and off at specific times

This should help....38468 doesn't seem to list but the info seems applicable....
http://www.thencc.com/LS/Instruction/58468_TimerManual.pdf
Take care.
3helpful
3answers

My Dell Inspirion Mini 10 is beeping 8 times when I turn it on. Nothing on the screen.

Try holding Fn + End with battery and power cord out and while still pressing Fn + End plug only power cable back in and try to power on.
0helpful
1answer

Instead of the heating element turning on the heat pump runs out side thermostate is not set on eheat

The heatpump is your 1st. stage heat, when you have a call for heat it will bring on the outdoor unit.
When the first stage heat can't heat the house and the indoor temperature drops 2° or 3° then 2nd. stage heat will kick in and maintain the house temperature at about 2° or 3° below the temperature setting.
If you outdoor unit fails or goes into defrost then emergency heat will kick in and keep the house at 2nd stage temperature approximately 2° or 3° below thermostat setting.
If you have an outdoor thermostat or balance point setting on outdoor board, it will shut the outdoor unit off at a certain set outdoor temperature and the 2nd stage heat will be primary heat for the house.
4helpful
1answer

Problem panasonic H16

Pls. check the thermostat setting. It has a setting equal to the outside temperature of -2"C. If this can still be lowered down, then I believe that it will keep your Panasonic H 16 working without interruption. You are
definitely right, your AC is working normally.
1helpful
1answer

I want to do a london broil on the GF outdoor need temp settings

If you want to cook by temperature, you can get a bbq meat thermometer. I use the one that is shaped like a fork. It can be programed to the type of meat, beef, chicken, etc. and how well done you want to cook it like medium, well etc. It has a digital read out and will beep when the correct temperature is reached.
0helpful
1answer

Frigidaire range model #fgfl67dcf needs to be calabrated, too hot for setting

OVEN CALIBRATION Set the electronic oven control for normal baking at 350°F. Obtain an average oven temperature after a minimum of 5 cycles. Press CANCEL or CLEAR to end bake mode. TEMPERATURE ADJUSTMENT 1. Set EOC to bake at 550°F. 2. Within 5 seconds of setting 550°F, press and hold the bake pad for approximately 15 seconds until a single beep is heard (longer may cause F11 shorted keypad alarm). 3. Calibration offset should appear in the display. 4. Use the slew keys to adjust the oven temperature up or down 35°F in 5°F increments. 5. Once the desired (-35° to 35°) offset has been applied, press CANCEL or CLEAR. Note: Changing calibration affects both Speed Bake and normal bake modes. The adjustments made will not change the self-cleaning temperature.
Not finding what you are looking for?

271 views

Ask a Question

Usually answered in minutes!

Top Equity Time USA Measuring Tools & Sensors Experts

Brad Brown

Level 3 Expert

19187 Answers

ADMIN Eric
ADMIN Eric

Level 3 Expert

39389 Answers

ADMIN Andrew
ADMIN Andrew

Level 3 Expert

66963 Answers

Are you an Equity Time USA Measuring Tool and Sensor Expert? Answer questions, earn points and help others

Answer questions

Manuals & User Guides

Loading...