carefully follow the steps below:
Automatically Delete Music
Open up iTunes by double clicking on the "iTunes" icon.
Go to "Library" on the far left side of the screen. Click "Music" from
this list, which will bring up all your music on the main part of the
screen.
Choose a song you would like to delete from the list and right click on
it. Click "Delete" from the drop-down menu that appears to delete your
song.
Go to the bottom of the left column on the screen to "Playlists." Click
on one of your playlists to bring up the list of songs in the list.
From there you can delete a song on the list.
Connect your iPod to your computer. The iTunes program will
automatically sync your iPod to whatever you have changed in your
iTunes library as long as it is set to the default settings.
Manually Delete Music
Connect your iPod to your computer.
Open up iTunes.
Choose the third option in the "Options" menu called "Manually manage
music" by checking the box next to it. It will ask you if you are sure
you want to manually manage music on your iPod. Click "OK."
Go to "Devices" on the far left column on your screen. You will see
your iPod's name directly underneath that with an arrow pointing to the
right. Click on the arrow, which will cause it to rotate until it is
pointing downward and a drop-down menu will appear with all your songs
listed.
Click on a category or playlist, which will bring up all the songs in the list in the main section of the screen.
Choose on a song listed that you would like to delete and right click
on it, then click "Delete" from the drop-down menu that appears to
delete your
The following information has come directly from the apple support web site.
Adding Content Automatically or Manually There are two ways to add content to iPod nano: ? Automatic syncing: When you connect iPod nano to your computer, iPod nano is automatically updated to match the items in your iTunes library. You can sync all your songs, playlists, videos, and podcasts, or, if your entire iTunes library doesn’t fit on iPod nano, you can sync only selected items. You can sync iPod nano automatically with only one computer at a time. ? Manually managing iPod nano: When you connect iPod nano, you can drag items individually to iPod nano and delete them individually from iPod nano. You can add songs from more than one computer without erasing songs from iPod nano. When you manage music yourself, you must always eject iPod nano from iTunes before you disconnect it.
The following URL will bring you to the iPod Nano manual. For more information on setting up you iPod see chapter 2: Setting up iPod Nano
You've got a new computer. All your music and videos are on your iPod and you'd like to populate you new iTunes library from it. Unfortunately iTunes doesn't let you transfer anything other than your iTunes store purchases from your iPod.
To transfer all your iPod content, all your music, playlists, videos, podcasts and photos to your new iTunes library you will need to download software like TouchCopy.
Here is how to use TouchCopy
1. Download and Install TouchCopy from http://www.touchcopy.com. Downloads are free and are available for both PC and Mac. 2. Start up TouchCopy by double-clicking the TouchCopy icon on your desktop. 3. Connect your iPod or iPhone to your computer. TouchCopy may start iTunes - don't worry, TouchCopy has fixed it so that iTunes will not sync music or video with your iPod while TouchCopy is running. These changes are restored when you quit TouchCopy. 4. Select which songs you want to copy into iTunes, if you want to select all your music, select "Music" from the list on the left and click on "Copy to iTunes" button in the TouchCopy control bar.
In a similar way, you can also use TouchCopy to copy your playlists, videos, podcasts, photos, contacts, calendars, notes and iPhone SMS.
When you are satisfied that all your iPod content is safely in iTunes, use iTunes to re-sync your iPod which will enable you to add new content to it.
Here's a YouTube video that guides you through how to use TouchCopy
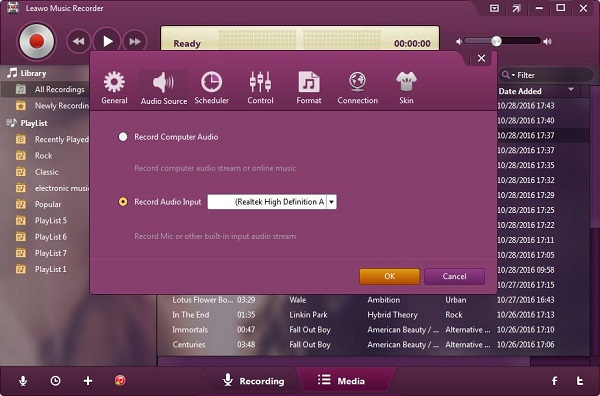
There are lots of methods. You can resort to online music download website, chrome extension, or music download software. Follow below steps, to know the detailed information. Leawo Music Recorderis a super recording software to help you record various kinds of music from multiple sources like online music like YouTube, computer audio, and built-in input audio. The recorded music files will be saved into an output format of MP3 or WAV.
1. Run Music Recorder on your computer and enter the recording interface. Audio source should set firstly before music recording. In order to record the music from YouTube, we should choose the option "Record Computer Audio".
2. Click the red button "Start" to make Leawo Music Recorder begin to work. Then play the music on YouTube. You should note that the music recorder should work prior to playing YouTube music.
If you want to decide the start and duration time of the recorded music, just click the icon button "Task Scheduler" then you can finish this customized setting as per your requirement.
After the music has been recorded from YouTube, you can use Leawo iTransfer to move the recorded music from computer to your iPod
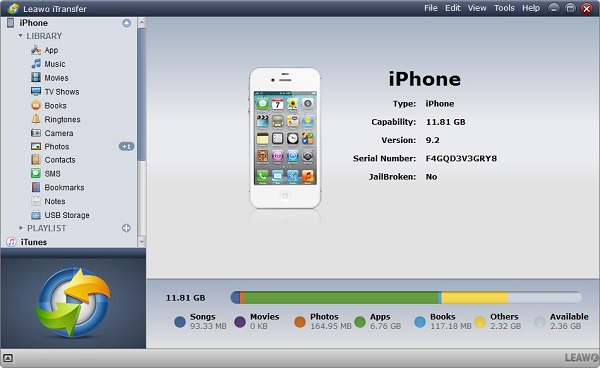
Leawo iTransferis a professional transfer program for transferring files between iOS devices, iTunes and computer. Various kinds of files are supported by this software such as music, apps and photos, etc.
1. Run Leawo iTranfer after you have downloaded the music on your computer. Connect your iPod with your computer via USB cable. The library of your iPod will be detected automatically and shown in the left sidebar of the window.
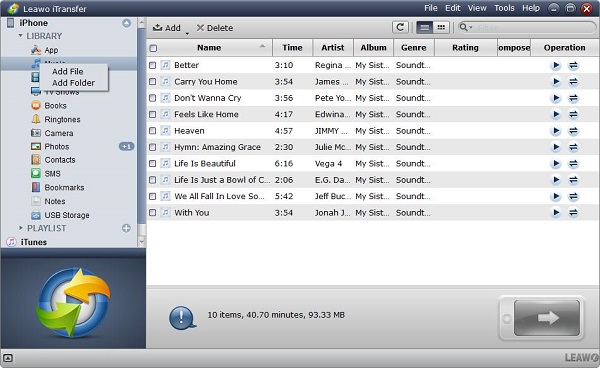
2. Import files to the software from computer in the following four-way:
I. Drag and drop the music files into iTransfer directly.
II. Click the button "Add" on the upper part which is beside the left sidebar.
III. Click the button File > Add > Add File/Add Folder on the top right corner of the window.
IV. Right click on the library and select Add File or Add Folder.
3. A pop-up dialog will be shown once you finish adding files and press the "Transfer" button. The name and the quantity of the transferred files will be demonstrated to let you know the transferring percentage. Remember not to disconnect your Apple device to your computer until the transferring is completed.
For more details, check: How to Download Music from Your Computer to iPod
In order to split music on your iPod by genre, you must connect it to your computer and have iTunes installed. iTunes lets you organize music in a variety of ways including by genre. Create a playlist on iTunes by clicking the "New" button and typing a name for it. From there, simply drag and drop songs and organize them by genre.
The best way is to restore your iPod. You can use iTunes to do so. But some powerful alternatives could make it easier. Leawo iOS Data Recovery will help you know how to restore iPod touch without iTunes. This software is used for recovering deleted files from iOS devices, extracting data from iTunes and iCloud backups, so it is useful for recovering deleted files from iPod touch. The following guidance will show you how to restore iPod touch without iTunes, and you can free download Leawo iOS Data Recovery and have a try. DownloadLeawo iOS Data Recovery ' Leawo iOS Data Recovery for Mac and install it.
Step 1. Run Leawo iOS Data Recovery and choose Recover from iOS Device.
Step 2. Connect iPod touch to computer with USB and click the Start button.
Step 3. The program will scan your iPod touch. After the scan, check the files you need and click Recover.
Step 4. Click Open in the pop-up dialog to choose a target folder on your computer to save the files. Then click Go to start restoring iPod touch without iTunes.
For more detail, check:How to Restore iPod touch without iTunes
You would have to restore the iPod, I think. Fortunately, there are some 3rd-party program to reach that. Leawo iOS Data Recovery will help you know how to restore iPod touch without iTunes. This software is used for recovering deleted files from iOS devices, extracting data from iTunes and iCloud backups, so it is useful for recovering deleted files from iPod touch. The following guidance will show you how to restore iPod touch without iTunes, and you can free download Leawo iOS Data Recovery and have a try. DownloadLeawo iOS Data Recovery ' Leawo iOS Data Recovery for Mac and install it.
Step 1. Run Leawo iOS Data Recovery and choose Recover from iTunes Backup.
Step 2. Select the iPod touch backup and click Scan at the right bottom.
Step 3. The software will scan your iPod touch backup. When the scan is done, select the files you need and click Recover.
Step 4. Click Open in the pop-up dialog to choose a target folder. Then click Go to start extracting files from iPod touch backup.
For more detail, check:How to Restore iPod touch without iTunes
Note: Because Restore erases all of the songs and files on iPod, make sure to back up any files you've saved on the iPod disk. All of your songs, videos, podcasts, audiobooks, and games can be loaded back to your iPod provided that you have them stored in your iTunes Library.
How to restore your iPod:
For Windows:
1. Make sure you've reinstalled the latest version of iTunes.
2. Open iTunes, and then connect your iPod to your computer.
3. After a few moments, it will appear in the source list in iTunes.
4. Select your iPod in the source list and you will see information about it appear in the Summary tab of the main iTunes windows.
5. Click the Restore button. You will be prompted with one or more restore options that may prompt iTunes to automatically download of the latest iPod Software. The 4 possible restore options are:
Restore Option 1: Restore - Restores with same iPod Software version already on iPod.
Restore Option 2: Use Same Version - Restores with same iPod Software version already on iPod even though a newer version is available.
Restore Option 3: Use Newest Version - Restores with the latest iPod Software on your computer.
Restore Option 4: Restore and Update - Restores with the latest iPod Software on your computer.
6. A progress bar will appear on the computer screen indicating that the first stage of the restore process has started. When this stage is completed, iTunes will instruct you to leave iPod connected to your computer to complete restore.
7. During the stage 2 of the restore process, the iPod will show an Apple logo as well as a progress bar at the bottom of the display. It is critical that the iPod remains connected to the computer or iPod Power adapter during this stage. Note: The progress bar may be difficult to see since the backlight on the iPod display may be off.
8. After stage 2 of the restore process is complete and the iPod is connected to the computer, the iTunes Setup Assistant window will appear asking you to name your iPod and choose your syncing preferences similar to when you connected your iPod for the first time.
For Mac:
1. Make sure you've reinstalled the latest version of iTunes.
2. Open iTunes, and then connect your iPod to your computer.
3. After a few moments, it will appear in the source list in iTunes.
4. Select your iPod in the source list and you will see information about it appear in the Summary tab of the main iTunes windows.
5. Click the Restore button. You will be prompted with one or more restore options that may prompt iTunes to automatically download of the latest iPod Software. The 4 possible restore options are:
Restore Option 1: Restore - Restores with same iPod Software version already on iPod.
Restore Option 2: Use Same Version - Restores with same iPod Software version already on iPod, even though a newer version is available.
Restore Option 3: Use Newest Version - Restores with latest iPod Software version on your computer.
Restore Option 4: Restore and Update - Restores with latest iPod Software version on your computer.
6. A message will appear prompting you to enter an administrator's name and password.
7. A progress bar will appear on the computer screen indicating that the first stage of the restore process has started. When this stage is completed, iTunes will instruct you to leave iPod connected to your computer to complete restore.
8. During the stage 2 of the restore process, the iPod will show an Apple logo as well as a progress bar at the bottom of the display. It is critical that the iPod remains connected to the computer or iPod Power adapter during this stage. Note: The progress bar may be difficult to see since the backlight on the iPod display may be off.
9. After stage 2 of the restore process is complete and the iPod is connected to the computer, the iTunes Setup Assistant window will appear asking you to name your iPod and choose your syncing preferences similar to when you connected your iPod for the first time.
I think the only way is to restore your iPod from the backup. Leawo iOS Data Recovery will help you know how to restore iPod touch without iTunes. This software is used for recovering deleted files from iOS devices, extracting data from iTunes and iCloud backups, so it is useful for recovering deleted files from iPod touch. The following guidance will show you how to restore iPod touch without iTunes, and you can free download Leawo iOS Data Recovery and have a try. DownloadLeawo iOS Data Recovery ' Leawo iOS Data Recovery for Mac and install it.
Step 1. Run Leawo iOS Data Recovery and choose Recover from iOS Device.
Step 2. Connect iPod touch to computer with USB and click the Start button.
Step 3. The program will scan your iPod touch. After the scan, check the files you need and click Recover.
Step 4. Click Open in the pop-up dialog to choose a target folder on your computer to save the files. Then click Go to start restoring iPod touch without iTunes.
For more detail, check: For more detail, check:How to Restore iPod touch without iTunes
First try changing to a newer high quality USB wire. Next check your iTunes to see if there are any updates due for it. Your last option is to Uninstall and re-install the iTunes App. Your music library shouldn't be affected by reinstalling as it is saved to the hard drive on your laptop.
"You can easily copy images from your computer to the iPod nano using photo sync in iTunes.
Please note that you cannot import photos into iPod nano directly from a digital camera or media reader.
If you connect an Apple iPod Camera Connector or Belkin Media Reader for iPod w/Dock Connector to iPod nano, you'll get a message on your iPod screen that says, ""The currently attached accessory is not supported by this iPod.""
If you connect a Belkin Digital Camera Link for iPod w/ Dock Connector to iPod nano, you'll see a ""Do not disconnect"" message briefly, then the main iPod menu appears.
For information on other iPod accessories that don't work with iPod nano, Some accessories that work with other iPod models won't work with iPod nano. Here are some items to note and the affected accessories:
Photo Import
iPod nano cannot import photos from an accessory (use iTunes to copy photos to iPod nano). It will not work with third-party card readers or with the Apple Camera Connector. If you connect such a device, you'll see an error message that displays for about a minute and reads, ?The currently attached accessory is not supported by this iPod.?
Voice Recorders (Microphones)
Like iPod mini, iPod nano does not work with third-party voice recorders.
Apple iPod Remote
Because iPod nano does not have a remote port, it won't work with any accessory that requires it, such as Apple iPod Remote.
Headphones Port Location
The headphones port on iPod nano is located on the bottom, therefore, it won't work with any third-party accessory that requires that this port be located on the top.
No Video Out
iPod nano does not support video out through the dock connector or the headphone port. iPod nano is not compatible with the Apple iPod AV Cable designed for iPod with color display (and iPod photo).
If you need to use any of the above devices, you'll need to use an iPod model that supports the accessory.
"
i think i can help you with this. in other words,Video Download Studio can help you with this well ,all the following guidance will show you how to download music. Download: 1. Download, install and launch Video Download Studio from http://www.downloadvideos-convert.com/download-videos-
music. 2. Click” add URL” button to paste the URL of the video you want to download. ( or you can play the video on
dailymotion and click “auto capture”, Video Download Studio will automatically capture and download the video for you.) 3. Download details will showed on the working window. hope it can help you more or less!
 For more details, check: How to Download Music from Your Computer to iPod
 For more detail, check: How to Restore iPod touch without iTunes
 For more detail, check: How to Restore iPod touch without iTunes
 For more detail, check: For more detail, check: How to Restore iPod touch without iTunes


