This page applies to the BMW motorcycle models R50/5, R60/5, R75/5, R60/6, R75/6, R90/6, R90S and some later models
If this is your first time adjusting the valves on this engine, I suggest checking the torque on the 6 fasteners, 4 nuts and 2 bolts. I would break them loose and watch the beam torque wrench readings. Then slowly tighten it up to 25 lbs. Now go to the next one. The order is not important, as there are so few of them.
The engine is cold. The head is made of aluminum. Aluminum has an interesting characteristic called cold flow. If it is put under some stress it will slowly conform to relieve the stress. For example; if we removed the torque on one head bolt and left it overnight, it might (probably not) be enough for the head to warp. A warped head is a problem. If we remove the torque from one or more head bolts for a few minutes, nothing will happen. That is what we do for this adjustment. On the rocker arm that has the mis-aligned pushrod, back off the two head nuts. Measure the torque that it takes to "break" it loose. It should be about 25 lbs. Apply torque slowly for this measurement. If it is very far off, be cautious and consider that other nuts may be off too. It shouldn't be over 25 ft. lbs. One risks pulling the head bolt out of the engine case, not good. I would much rather find a nut at 20 lbs. than 30 lbs. (BMW had rocker shaft end blocks that were a very tight fit in 70-71 or so. Later they went to one with a split in it. They didn't need to be held tightly while torquing the head.) Now you have the 70-71 rocker arm loose and it needs to be "held" while the nuts are tightened. Here is how we did it.
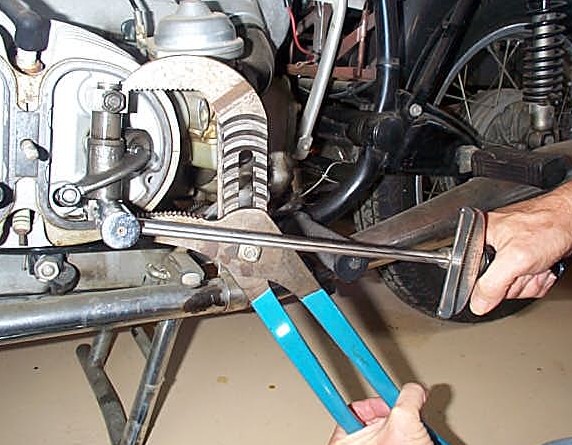
That is a giant pair of adjustable pliers. It is tricky to pinch the blocks on the ends of the rocker arms just the right amount while applying torque to the nuts. Sometimes the blocks resist being pinched together and I resort to a tap with a hammer on the top and bottom jaw of the pliers. Between the end block and the rocker arm is a wave washer. Tighten the nuts up a bit to hold everything in place and check for end play. Check the arm to see that it still rotates a bit and freely. It may be required to loosen up the valve adjustment somewhat to allow enough movement to see the rotation and that it is smooth. The up and down play should be gone. The pushrod must still be centered in the hole. It is a lot of things to get right all at once. The first time you may need a "third hand". My hand position shown is only for the photograph. I actually have the torque wrench vertical and upside down. When you are happy with the position of the rocker arm and pushrod, torque the nuts to 25 ft. lbs. Pull them up slowly to 25 lbs. The split type rocker arm end blocks can be held by hand. Check the other rocker arm on that side for alignment and correct as needed. Rotate the engine and do the other side.
12. Now is the time to check and adjust the valves. Find the specification for your bike and the appropriate feeler gauge. The /5 is .006," or .15 mm for the intake and .008," or .2 mm for the exhaust. The valve gap, or lash, is not really important in the operation of the engine.
The /2 had valve adjustment that drifted all over the place. BMW could have just been cautious on the first /5 and suggested a large clearance at first. Later on they learned that the heads were stable. With the /7 they used a tighter setting and it was no problem.
I use a feeler gauge from BMW tool kit. The size was once marked on each gauge, but now it is probably invisible. Of the four feelers, use the thinnest one for intake and the slightly thicker one for the exhaust. Insert the gauge into the space between the rocker arm and the end of the valve. Sometimes it is easier to get it in if you push on the other end of the rocker arm, which is against the pushrod. That will take up any free play in the system. Don't worry, you won't crush the pushrod.
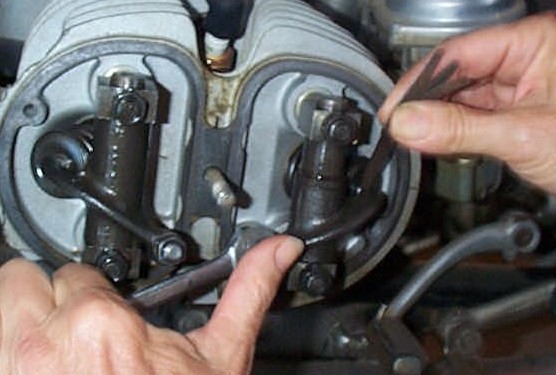
13. This photo shows the left side of the engine and tools working in the intake valve. My left hand is holding the 12mm open end wrench and that thumb is pushing on the pushrod. My right hand is holding the feeler gauge. The open end wrench is on the inside bolt. The outside nut is the jamb nut for holding the bolt in place.
14. Here is place for you to develop your style. I prefer the feeler to go through with some drag. If it is too easy then you don't really know that you have taken up all of the play. It definitely shouldn't fall out of it's own weight. The important thing is to always do it with the same amount of drag on the feeler. Don't obsess over this. The difference between a really tight setting and a slightly loose one is probably less than .001." If you are off by .002" and all else is OK, then no large change in noise will occur. No engine failure will occur.
15. Each time that one checks the valves, it is not to correct some small error, but to discover if the setting is changing between adjustments. Record any significant change and be sure to check it again in 1000 miles or so. If the change is measurable in 1000 miles, then something is wrong and you have found it before it failed on the road, at night and in the rain. Check it often and log the change. Get ready to spend money.
16. Now to actually adjust the valve. On the left end of the rocker arm, in the last photo, is an adjustment. See that bolt and nut? Loosen the (outside) jamb nut. Slowly move the bolt a tiny bit. A quarter of a turn is a large amount. Once you feel good about the drag on the feeler, tighten up the nut while still holding the bolt. It should be tight, but not over tight. I tighten mine to about 15-18 lbs. of torque. If this one is over tightened it will strip the threads on the bolt. Now check the feeler gauge again. If it's not what you wanted, try again. It takes some fiddling around to learn where to have it to get it correct after it's tightened up.
17. Do the exhaust valve too and you have finished one side and it's time for the other side. Turn the crankshaft one full turn and the advance unit will go around 1/2 turn to the same 10-4 position. In the case of my photo, the red paint would appear on the other end. Find the OT mark in the window. Again check the pushrods to be sure that they will rotate easily.

12 questions posted
Usually answered in minutes!

117 Questions

42 Questions

48 Questions

40 Questions

36 Questions

