1996 Toyota Camry Logo
Posted on Nov 10, 2009
Answered by a Fixya Expert

Trustworthy Expert Solutions

At Fixya.com, our trusted experts are meticulously vetted and possess extensive experience in their respective fields. Backed by a community of knowledgeable professionals, our platform ensures that the solutions provided are thoroughly researched and validated.

View Our Top Experts

How do you align or focus headlights beams that are to

How do you align or focus headlight beams that are to low or to high?

1 Answer

ZJ Limited

Level 3:

An expert who has achieved level 3 by getting 1000 points

Superstar:

An expert that got 20 achievements.

All-Star:

An expert that got 10 achievements.

MVP:

An expert that got 5 achievements.

  • Toyota Master 17,989 Answers
  • Posted on Nov 10, 2009
ZJ Limited
Toyota Master
Level 3:

An expert who has achieved level 3 by getting 1000 points

Superstar:

An expert that got 20 achievements.

All-Star:

An expert that got 10 achievements.

MVP:

An expert that got 5 achievements.

Joined: Jul 15, 2008
Answers
17989
Questions
0
Helped
14450453
Points
60858

AIMING THE HEADLIGHTS

The headlights must be properly aimed to provide the best, safest road illumination. The lights should be checked for proper aim and adjusted as necessary. Certain state and local authorities have requirements for headlight aiming; these should be checked before adjustment is made.

CAUTION About once a year, when the headlights are replaced or any time front end work is performed on your vehicle, the headlight should be accurately aimed by a reputable repair shop using the proper equipment. Headlights not properly aimed can make it virtually impossible to see and may blind other drivers on the road, possibly causing an accident. Note that the following procedure is a temporary fix, until you can take your vehicle to a repair shop for a proper adjustment.
Headlight adjustment may be temporarily made using a wall, as described below, or on the rear of another vehicle. When adjusted, the lights should not glare in oncoming car or truck windshields, nor should they illuminate the passenger compartment of vehicles driving in front of you. These adjustments are rough and should always be fine-tuned by a repair shop which is equipped with headlight aiming tools. Improper adjustments may be both dangerous and illegal.
For most of the vehicles covered by this guide, horizontal and vertical aiming of each sealed beam unit is provided by two adjusting screws which move the retaining ring and adjusting plate against the tension of a coil spring. There is no adjustment for focus; this is done during headlight manufacturing.
Because the composite headlight assembly is bolted into position, no adjustment should be necessary or possible. Some applications, however, may be bolted to an adjuster plate or may be retained by adjusting screws. If so, follow this procedure when adjusting the lights, BUT always have the adjustment checked by a reputable shop.
Before removing the headlight bulb or disturbing the headlamp in any way, note the current settings in order to ease headlight adjustment upon reassembly. If the high or low beam setting of the old lamp still works, this can be done using the wall of a garage or a building:

  1. Park the vehicle on a level surface, with the fuel tank about 1 / 2 full and with the vehicle empty of all extra cargo (unless normally carried). The vehicle should be facing a wall which is no less than 6 feet (1.8m) high and 12 feet (3.7m) wide. The front of the vehicle should be about 25 feet from the wall.

How do you align or focus headlights beams that ar - fbcb5a7.jpg

Fig. : Location of the aiming screws on most vehicles with sealed beam headlights


Fig. : Dual headlight adjustment screw locations-one side shown hHow do you align or focus headlights beams that ar - 9a545e8.jpgside should be mirror image)

9a545e8.jpg

Fig. : Example of headlight adjustment screw location for composite headlamps
  1. If aiming is to be performed outdoors, it is advisable to wait until dusk in order to properly see the headlight beams on the wall. If done in a garage, darken the area around the wall as much as possible by closing shades or hanging cloth over the windows.
  2. Turn the headlights ON and mark the wall at the center of each light's low beam, then switch on the brights and mark the center of each light's high beam. A short length of masking tape which is visible from the front of the vehicle may be used. Although marking all four positions is advisable, marking one position from each light should be sufficient.

  3. 031bc2f.jpg

    How do you align or focus headlights beams that ar - 758eed8.jpgbeam headlight pattern alignment

    758eed8.jpg

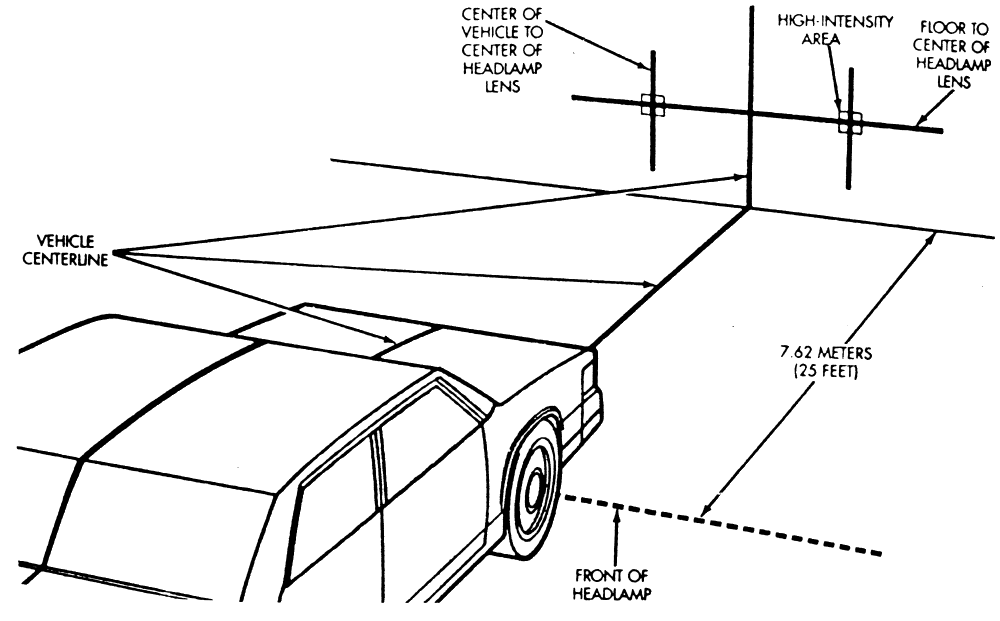
    Fig. : High-beam headlight pattern alignment

    1. If neither beam on one side is working, and if another like-sized vehicle is available, park the second one in the exact spot where the vehicle was and mark the beams using the same-side light. Then switch the vehicles so the one to be aimed is back in the original spot. It must be parked no closer to or farther away from the wall than the second vehicle.
    2. Perform any necessary repairs, but make sure the vehicle is not moved, or is returned to the exact spot from which the lights were marked. Turn the headlights ON and adjust the beams to match the marks on the wall.
    3. Have the headlight adjustment checked as soon as possible by a reputable repair shop.

    Hope helped with this information. Good luck (remember rated this help).

Add Your Answer

×

Uploading: 0%

my-video-file.mp4

Complete. Click "Add" to insert your video. Add

×

Loading...
Loading...

Related Questions:

0helpful
1answer

What is the spec.dis.hight to set headlight on 2003 dodge grand caravan

IF...... you do not have a headlight alignment tool........drive a van/car which has good aligned headlights about 15 feet from a wall.Mark the tire locations and headlight beam locations on low beam and high beam with a small piece of masking tape or mark the spots and now put your van on the same tire locations and adjust your headlights to match the wall marks.Quick and easy.
0helpful
2answers

Driver side headlight goes dim on high beam while passenger side is bright

bad connection or bad earth check all connection or bulb
0helpful
1answer

04 Focus low beam headlight issues.

you may have a bad head light switch
1helpful
2answers

Headlights do not work. Beam works, park lights and other lights work. Bulbs ok

more than likely a fuse or a relay is bad. locate the fuse for the headlights (owners manual) and check if it is bad, if the fuse is good, find the relay and give it a flick or two and try the headlights then, if they work, its time for a new relay
3helpful
1answer

Need to replace low beam headlight bulb

Hello,

it's easier to change the light bulbs in this car than in a lot of other vehicles. The 2008 pontiac Grand Prix uses separate bulbs for low beams and high beams. The low beams are located on the outer edge of the headlight assemblies while the high beams are located on the inner edge of the assemblies.
To replace the low beam of the headlight bulb You will be in need of these instruments(Soft blanket or towel, Latex gloves, 9006 replacement headlight (low beam)), please follow the steps below:
  1. Open the hood to the 2008 Pontiac Grand Prix after making sure the headlight switch is in the off position, and the keys are not in the ignition.
  2. Approach the headlight assembly with the spent headlight in it, and locate the retaining bracket (white) holding the assembly to the frame rail of the Grand Prix.
  3. Lift the retaining bracket up about a quarter of an inch in order to align the notches of the bracket to the riveted tabs on the frame.
  4. Pull the assembly forward away from the front of the car starting with the inner corner of the assembly toward the grill. Keep in mind the wire harness connection is still attached to the assembly, so only pull it far enough to reach behind and disconnect the plug located at the bottom of the assembly.
  5. Place the headlight and bulbs assembly lens down onto a soft towel or blanket.
  6. Disconnect the respective low beam or high beam wire harness.
  7. Turn the plastic base of the headlight counterclockwise a quarter turn to align the retaining tabs with the release notches. Remove the headlight from the headlight assembly.
  8. Put on latex gloves before handling the replacement low beam or high beam headlight. Oil from skin will compromise the life of the headlights if it contacts the glass bulb.
  9. Insert the new bulb into the assembly by aligning the retaining notches to the release tabs, and then turn the base of the headlight 1/4 clockwise to lock it into the headlight assembly. Reconnect the harness to the headlight.
  10. Bring the assembly back to the Grand Prix and reconnect the main wire harness at the bottom of the assembly.
  11. Align the guide pins at the back of the assembly to the locating holes in the front frame rail starting with the outer guide pin first and the inner (toward the grill) guide pin last. Lift the assembly upward while pushing back on the lens to push down on the retaining bracket.
  12. Place the key in the ignition and turn the key to accessory power.
Hope this helped. Thank You for using FixYa!!!
1helpful
2answers

How to replace a 2001 ford focus headlight switch assembly

p, li { white-space: pre-wrap; }

Turn the engine off, open the hood, and disconnect the negative battery cable (--) with your pliers.


Locate the power distribution box against the firewall on the driver's side of the engine compartment. Flip up the latch and remove the plastic cover.


Determine which headlight fuse you want to replace. The 2001 Ford Focus uses four headlight fuses--one for each headlight. Fuse number 16 is for the passenger side low beam; fuse number 17 is for the driver's side low beam. Fuse number 26 is for the passenger side high beam; fuse number 27 is for the driver's side high beam.


Grasp the fuse with your fingers and pull it straight out of its mount. Insert the new fuse in its place. Replace the plastic cover and reconnect the negative battery cable.

10helpful
1answer

My headlights need adjusting on my 2009 Ford Focus. Then point too low and have no night vision

The adjustment screws/nuts should be located either on the top of the headlamp assembly, behind the headlamp assembly, or near the frame rail by the radiator support.

You will have vertical adjustment screws for each independent beam (separate highs and separate lows, but will be same screw if highs and lows are the same bulb). You may also have additional horizontal adjustment screws as well

Park your car on a level ground 30 feet from a wall and measure the height from the ground to the bulb and mark on a wall (do this for highs beams and low beams if the bulbs are separate, if highs and lows are the same bulb, only do it for the lows)

For Low Beams: If the headlights read VOR, then aim the brightest part or cutoff part just below the mark on the wall. If it says VOL or nothing, aim them 2 inches below the mark on the wall.

For High Beams (if separate from low beams): Aim the headlight directly at the line you marked on the wall.
9helpful
1answer

What is are the correct headlight alignment specs for a 2001?


Park your car on a level ground 30 feet from a wall and measure the height from the ground to the bulb and mark on a wall (do this for highs beams and low beams if the bulbs are separate, if highs and lows are the same bulb, only do it for the lows)

For Low Beams: If the headlights read VOR, then aim the brightest part or cutoff part just below the mark on the wall. If it says VOL or nothing, aim them 2 inches below the mark on the wall.

For High Beams (if separate from low beams): Aim the headlight directly at the line you marked on the wall.

The adjustment screws/nuts should be located either on the top of the headlamp assembly, behind the headlamp assembly, or near the frame rail by the radiator support.

You will have vertical adjustment screws for each independent beam (separate highs and separate lows, but will be same screw if highs and lows are the same bulb). You may also have additional horizontal adjustment screws as well

2helpful
1answer

Headlight adjustment

The adjustment screws/nuts should be located either on the top of the headlamp assembly, behind the headlamp assembly, or near the frame rail by the radiator support.

You will have vertical adjustment screws for each independent beam (separate highs and separate lows, but will be same screw if highs and lows are the same bulb). You may also have additional horizontal adjustment screws as well

Park your car on a level ground 30 feet from a wall and measure the height from the ground to the bulb and mark on a wall (do this for highs beams and low beams if the bulbs are separate, if highs and lows are the same bulb, only do it for the lows)

For Low Beams: If the headlights read VOR, then aim the brightest part or cutoff part just below the mark on the wall. If it says VOL or nothing, aim them 2 inches below the mark on the wall.

For High Beams (if separate from low beams): Aim the headlight directly at the line you marked on the wall.
Not finding what you are looking for?

5,248 views

Ask a Question

Usually answered in minutes!

Top Toyota Experts

ZJ Limited
ZJ Limited

Level 3 Expert

17989 Answers

Ronny Bennett Sr.
Ronny Bennett Sr.

Level 3 Expert

6988 Answers

Thomas Perkins
Thomas Perkins

Level 3 Expert

15088 Answers

Are you a Toyota Expert? Answer questions, earn points and help others

Answer questions

Manuals & User Guides

Loading...