1998 Dodge Grand Caravan Logo
Anonymous Posted on Oct 28, 2009

Serpentine belt slipped off. I need a diagram

Serpentine belt slipped off. I need to know where the tensioner is loacted and the proper routing. I need a diagram. the 1998 Dodge Caravan has a 3.0 liter V6.

1 Answer

Mike Butler

Level 3:

An expert who has achieved level 3 by getting 1000 points

Superstar:

An expert that got 20 achievements.

All-Star:

An expert that got 10 achievements.

MVP:

An expert that got 5 achievements.

  • Dodge Master 6,674 Answers
  • Posted on Oct 28, 2009
Mike Butler
Dodge Master
Level 3:

An expert who has achieved level 3 by getting 1000 points

Superstar:

An expert that got 20 achievements.

All-Star:

An expert that got 10 achievements.

MVP:

An expert that got 5 achievements.

Joined: Aug 14, 2008
Answers
6674
Questions
10
Helped
2892868
Points
19845

How's this.
Serpentine belt slipped off. I need a diagram - 6a6fe03.jpg

Testimonial: "Awesome. Thats the one I thought it was, can't get it to move though on account I can't get a wrench on it. theres no room to get my hands in there!"

  • 1 more comment 
  • Mike Butler
    Mike Butler Oct 28, 2009

    This would be good to print & put in glove box.

  • Mike Butler
    Mike Butler Oct 28, 2009

    I believe some had a 1/2" square drive cut in the arm, for popping in a 1/2" drive ratchet, or johnson bar to make it easier. Just can't remember which one it was, as I've had 2.5L, 3.0L, 3.3L, and now 3.8L engines.

  • Anonymous Dec 19, 2012

    did you know that if you replace the tentioneer idler pully with a gm one it wont fall off any more you will need to grind one of the shoulders thinner so it wont rub in the idler any more

×

Add Your Answer

×

Uploading: 0%

my-video-file.mp4

Complete. Click "Add" to insert your video. Add

×

Loading...
Loading...

Related Questions:

0helpful
1answer

How do i remove the fan to replace the serpentine belt

Astro, Safari 1997-2005
Accessory Drive Belts

Print


Belt Tension Inspection

Inspect the drive belt for signs of glazing or cracking. A glazed belt will be perfectly smooth from slippage, while a good belt will have a slight texture of fabric visible. Cracks will usually start at the inner edge of the belt and run outward. All worn or damaged drive belts should be replaced immediately.


Drive Belt Routings


0996b43f8020955c.jpg enlarge_icon.gifenlarge_tooltip.gif

Fig. Accessory serpentine belt routing-4.3L engine


0996b43f8020955c.jpg enlarge_icon.gifenlarge_tooltip.gif

Fig. Accessory serpentine belt routing-4.3L engines


Removal & Installation

Belt replacement is a relatively simple matter rotating the tensioner off the belt (to relieve tension) and holding the tensioner in this position as the belt is slipped from its pulley. The tensioner arm contains a machined receiver for a 3 / 8 in. driver from a ratchet or breaker bar.

  1. Before you begin, visually confirm the belt routing to the engine compartment label (if present) or to the appropriate diagram in this section (if the label is not present). If you cannot make a match (perhaps it is not the original motor for this van), scribble your own diagram before proceeding.
  2. Disconnect the negative battery cable for safety.
  3. Install the appropriate sized breaker bar, wrench, or socket to the tensioner arm or pulley, as applicable.
  4. Rotate the tensioner to the left (counterclockwise) and slip the belt from the tensioner pulley.
  5. Once the belt is free from the tensioner, CAREFULLY rotate the tensioner back into position. DO NOT allow the tensioner to suddenly snap into place or damage could occur to the assembly.
  6. Slip the belt from the remaining pulleys (this can get difficult is there is little room between the radiator/fan assembly and the accessory pulleys. Work slowly and be patient.
  7. Once the belt is free, remove it from the engine compartment.

    0996b43f80224674.jpg enlarge_icon.gifenlarge_tooltip.gif

    Fig. On this 4.3L engine, a large wrench (16mm) was used to pivot the belt tensioner and free the belt


To install:
  1. Route the belt over all the pulleys except the water pump and/or the tensioner. Refer to the routing illustration that you identified as a match before beginning.

    0996b43f8020955c.jpg enlarge_icon.gifenlarge_tooltip.gif

    Fig. Accessory serpentine belt routing-4.3L engine

  2. Rotate the tensioner pulley to the left (counterclockwise) and hold it while you finish slipping the belt into position. Slowly allow the tensioner into contact with the belt.
  3. Check to see if the correct V-groove tracking is around each pulley.
    WARNING Improper V-groove tracking will cause the belt to fail in a short period of time.
  4. Connect the negative battery cable.
0helpful
1answer

Serpentine belt diagram for a 2003 Chevy unpalatable 4.3

Pop the hood of the car and locate the serpentine belt routing diagram. The diagram on the 2003 Chevrolet Impala is on top of the fan shroud. The diagram will be a picture of all of the accessory pulleys and how the serpentine belt is routed among the pulleys. This diagram will give you the exact direction for routing the new belt onto the pulleys. If you cannot find a serpentine belt routing diagram, take a notepad and pen and draw out the exact routing diagram of the old belt across the pulleys.

  • 2 Locate the serpentine belt tensioner. It is located below the alternator on the left front side of the engine. The tensioner on the 3.4 liter, 3.5 liter and the 3.9 liter engines will require a 3/8 ratchet to release the belt tensioner. The 3.8 liter engine will require a ratchet and a 15 mm socket for the belt tensioner. Rotate the belt tensioner clockwise to loosen and remove the belt from the belt tensioner pulley.
  • 3 Slide the old belt from the belt tensioner pulley. Remove the belt from the remaining pulleys and pull the belt from the engine compartment.
  • 4 Route the new belt across the crankshaft pulley first. The crankshaft pulley is the big pulley on the bottom of the engine in the center. Then route the serpentine belt across the remaining pulleys as directed by the serpentine belt routing diagram. Leave the belt tensioner pulley for last.
  • 5 Rotate the belt tensioner clockwise again to relieve the tension and slide the new belt across the top of the belt tensioner pulley. Release the belt tensioner and the belt will tighten up as the tensioner applies pressure to the belt. Make sure the new belt is properly seated in all the pulleys.
  • 6 Crank the engine and inspect the belt again to make sure that it stays seated in the pulleys.

  • Read more: How to Replace a Serpentine Belt on a 2003 Chevrolet Impala ' eHow.co.uk http://www.ehow.co.uk/how_6120665_replace-belt-2003-chevrolet-impala.html#ixzz1Yi6QLAjb
    0helpful
    1answer

    How do I replace the Airconditioning/power steering belt on a Grand marquis, Mercury(1992)? please show me in a diagram or print somehow

    Move the Grand Marquis's serpentine belt tensioner off the serpentine belt with the serpentine belt tool. Pull the belt of the remaining pulleys by hand. Take the belt out of the engine well. Wrap the new belt around the bottom portion of the crankshaft pulley. Follow the belt routing diagram to route the belt over each remaining pulley until only the tensioner remains. Move the Grand Marquis's serpentine belt tensioner aside once more and slip the belt onto the tensioner pulley.Hold the belt in place with one hand while you move the tensioner slowly back into position with the other. Here you can fine the quality AC parts http://www.1airconditioning.com/ac_compresor.htm
    18helpful
    2answers

    Need a diagram for a 99 toyota corolla serpentine belt

    • Here is the serpentine diagram for a 1999 Toyota Corolla with and without AC.

    ironfist109_31.gif


    • Thank you for using FixYa

    Regards, Tony
    2helpful
    3answers

    My year old Serpentine Belt came off last night somehow. Is there a way for me to put it back on myself without having to get it towed around the corner to the shop?

    if you have never installed a serpentine belt, it sometimes can be a chore, 1st you need to look under neath you cars hood for a serpentine belt diagram, it will show how the belt is routed, next you will need the approriate size socket, and ratchet to put onto the belt tensioner and route the belt back on to the routeing as reqiured, and once you get to the tensioner with the tool , pull back onto the tensioner and slip the belt back on , make sure that the belt is routed correctly, and evenly through the routeing. sometimes , it might take 2 people to do this, the type of socket on most are 14 or 15 metric size sockets, or you might have to slip a socket onto the bolt of the tensioner to see which one will fit, hope that this information has helped you. also you have to ask yourself a question, why did the belt come off, it is worn, or is the belt tensioner wearing out, and not holding the tension properly to the belt.
    3helpful
    1answer

    I need to replace the serpentine belt on my car. How do I do that?

    These instructions will help you . and also the picture below will help you more.
    1
    Locate the belt-routing diagram, printed on the fan shroud or possibly applied to the underside of the hood. This diagram shows you how to properly route the new belt, as well as identifying the location of the various pulleys, including the serpentine belt tensioner.
    2
    Move the belt tensioner off the Sable's belt using the serpentine belt tool. The tool connects to the side of the tensioner's arm and essentially acts as a handle for use in moving the tensioner. You can purchase a serpentine belt tool at most auto-part retailers.
    3
    Slip the belt away from the tensioner with your free hand and release the pressure on the tensioner with the tool. Pull the belt off the rest of the pulleys by hand and then remove it from the engine well.
    4
    Grab the old belt and new belt with one hand and put your foot through the other end of the belts. Stretch them both to their full length and check to ensure their both the same size. The old belt may have up to one-inch of extra length due to normal stretching that occurs during the belt's service life.
    5
    Wind the new belt, rib side to the pulley, around the crankshaft pulley. Consult the routing diagram and route the belt to the next pulley on the diagram. Continue to route and then check the diagram until you have the belt wound around every pulley except the belt tensioner pulley.
    6
    Double check to make sure the belt routes exactly as shown on the diagram and then move the tensioner aside once more so you can route the belt over the tensioner pulley as shown in the diagram. Move the tensioner back into place slowly and remove the tool.

    Good luck

    tgv1501_23.jpg


    2helpful
    1answer

    JUST A DIAGRAM OF THE SERPENTINE BELT ROUTE

    The diagram can be found here.
    Remove the upper fan shroud and aircleaner assemblies for easy access.
    To release tension on the belt turn the tensioner pulley nut clockwise and slip the belt off the alternator pulley. To refit the belt route as shown over every pulley except the alternator, once again release the tensioner and fit the belt to the alternator. See that the belt is properly seated over every pulley before restarting the engine.
    0helpful
    1answer

    Timing belt diagram

    complete procedures are posted at AutoZone.com: http://www.autozone.com/autozone/repairinfo/repairguide/repairGuideContent.jsp?pageId=0900c152802619fd

    Do you mean timing belt ot serpentine (accessory) belt?
    Belt diagrams are below:


    0900c15280261782.jpg enlarge_icon.gifenlarge_tooltip.gif Fig. Belt routings on the 1FZ-FE engine


    0900c15280261783.jpg enlarge_icon.gifenlarge_tooltip.gif Fig. Belt routings on the 3RZ-FE engine


    0900c15280261784.jpg enlarge_icon.gifenlarge_tooltip.gif Fig. Belt routings on the 5VZ-FE engine
    2UZ-FE Engine
    To remove the serpentine belt on the 2UZ-FE engine, position a suitable sized wrench or ratchet and socket over the belt tensioner bolt, rotate the tensioner counterclockwise to release the belt tension, then remove the belt. The pulley bolt for the tensioner has a left-hand thread.
    When installing the belt, make sure it fits properly in the ribbed grooves and check to be sure the belt has NOT slipped out of the groove on the bottom of the pulley.


    0900c15280261785.jpg enlarge_icon.gifenlarge_tooltip.gif Fig. On the 2UZ-FE engine, rotate the belt tensioner counterclockwise to release the belt tension
    9helpful
    2answers

    I need a diagram of the serpentine for a ford focus 2002 z3

    Hi

    Thanks for using FixYa. You can look at this picture for serpentine belt for your 2002 Ford Focus Z3--

    3103caa.jpg

    Ford Focus Z3 Serpentine belt Removal--

    · Jack up the front of the vehicle and support it on jack stands. Use a wrench to remove two bolts and take off the drive belt lower cover.
    · Note belt routing and make a sketch for your reference if you don't have a belt routing diagram from the manufacturer.
    · Find the belt tensioner pulley. Use your wrench to rotate the tensioner pulley by pulling clockwise on a bolt in the center of the pulley. Slip the old belt off of the tensioner pulley.
    · Release the belt tensioner. Slip the belt off of the pulleys and install the new belt according to your routing diagram.
    · Rotate the tensioner again to allow the new belt to slip over the tensioner pulley. Release the tensioner again. Replace the drive belt lower cover and lower the vehicle.

    Please do rate the solution and revert for further assistance.

    Thanks
    Rylee
    51helpful
    5answers

    Serpentine belt replacement

    2.0L Engines
    See Figures 11, 12 and 13
    The accessory drive belt for 2.0L engines has no provision for manual belt adjustment, since these engines use an automatic belt tensioner. Drive belt slack is taken up by the automatic tensioner.
    Movement of the automatic tensioner assembly during engine operation is not a sign of a malfunctioning tensioner. This movement is the tensioner self-adjusting and is required to maintain constant belt tension.
    The belt tensioner has a belt length indicator. If the indicator marks are not between the MIN and MAX marks, the belt must be replaced.
    0900c1528008d836.jpg
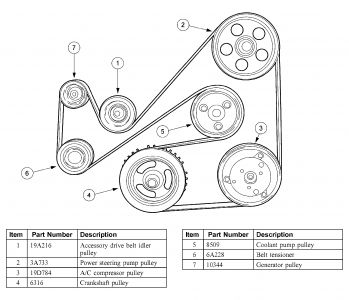
Fig. 11: Drive belt routing-2.0L SOHC engine with A/C 0900c1528008d837.jpgFig. 12: Drive belt routing-2.0L SOHC engine without A/C 0900c1528008d838.jpgFig. 13: Drive belt routing-2.0L DOHC engine
    Not finding what you are looking for?

    1,887 views

    Ask a Question

    Usually answered in minutes!

    Top Dodge Experts

    ZJ Limited
    ZJ Limited

    Level 3 Expert

    17989 Answers

    Ronny Bennett Sr.
    Ronny Bennett Sr.

    Level 3 Expert

    6988 Answers

    Thomas Perkins
    Thomas Perkins

    Level 3 Expert

    15088 Answers

    Are you a Dodge Expert? Answer questions, earn points and help others

    Answer questions

    Manuals & User Guides

    Loading...