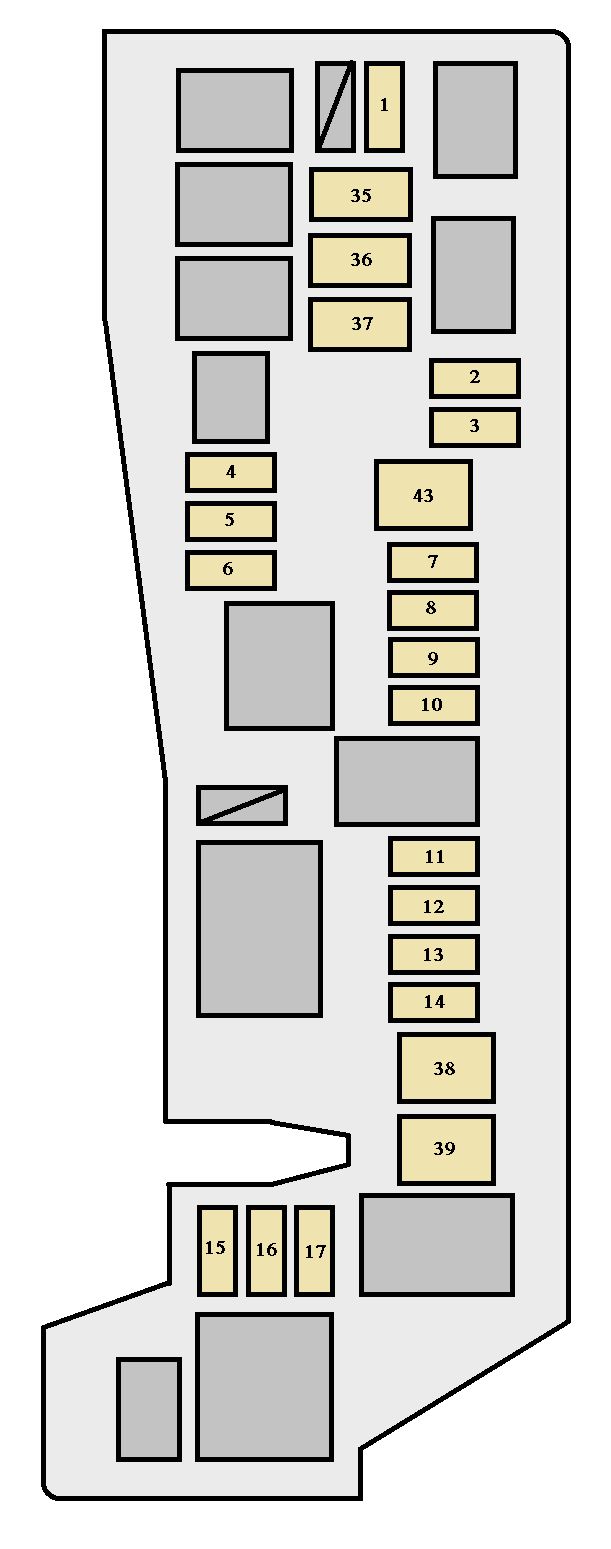
2000 Mercedes-Benz E-Class Logo

Related Topics:

Posted on Feb 11, 2012
Answered by a Fixya Expert

Trustworthy Expert Solutions

At Fixya.com, our trusted experts are meticulously vetted and possess extensive experience in their respective fields. Backed by a community of knowledgeable professionals, our platform ensures that the solutions provided are thoroughly researched and validated.

View Our Top Experts

Audio 30 problem - 2000 Mercedes-Benz E-Class

  • lahti_3
    lahti_3 Feb 11, 2012

    My casette player (becker audio 30 be 3307) won't start at all after I replaced a new battery. Can I fix this problem by myself?

×

1 Answer

christop_bader

Level 2:

An expert who has achieved level 2 by getting 100 points

MVP:

An expert that got 5 achievements.

Passionate:

Visited the website for 10 consecutive days.

Habit-Forming:

Visited the website for 3 consecutive days.

  • Expert 37 Answers
  • Posted on Feb 12, 2012
christop_bader
Expert
Level 2:

An expert who has achieved level 2 by getting 100 points

MVP:

An expert that got 5 achievements.

Passionate:

Visited the website for 10 consecutive days.

Habit-Forming:

Visited the website for 3 consecutive days.

Joined: Feb 11, 2012
Answers
37
Questions
5
Helped
12773
Points
101

Add Your Answer

×

Uploading: 0%

my-video-file.mp4

Complete. Click "Add" to insert your video. Add

×

Loading...
Loading...

Related Questions:

0helpful
1answer

How to reset 2015 Isuzu MU-X Audio and Navigation Head unit

To reset the 2015 Isuzu MU-X audio and navigation head unit, you can try the following steps:

Turn off the vehicle and disconnect the battery for at least 30 minutes.

Reconnect the battery and turn on the vehicle.

Press and hold the power button on the audio and navigation head unit for at least 10 seconds until the system restarts.

Try using the buttons and see if they are working properly.

If the above steps do not work, it may be necessary to consult the vehicle's owner's manual or contact a Isuzu dealership for further assistance.
0helpful
1answer

How many fuse boxes are there on a 2005 Toyota matrix XR

Engine compartment

Toyota Matrix - fuse box - engine compartment
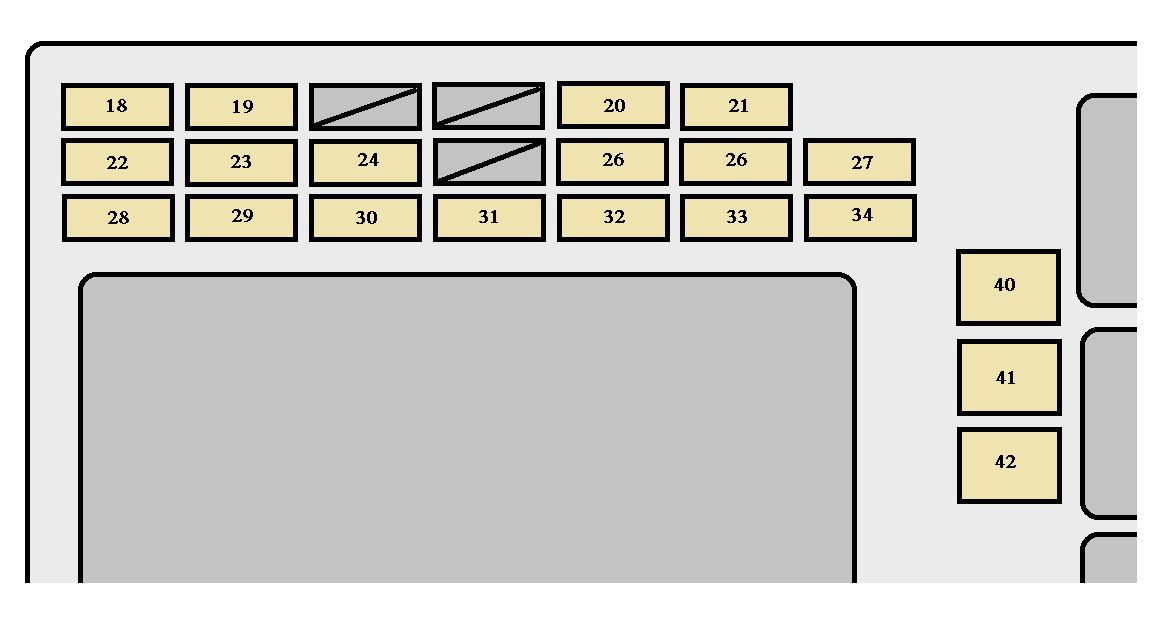
Instrument panel

Toyota Matrix - fuse box - instrument panel

Fuses (type A)

Fuse Ampere rating Description 1 FOG 15 Front fog lights 2 HEAD LH UPR 10 Left?hand headlight (high beam) 3 HEAD RH UPR 10 Right?hand headlight (high beam), high beam indicator light 4 SPARE 30 Spare fuse 5 SPARE 15 Spare fuse 6 SPARE 10 Spare fuse 7 ETCS (1ZZ?FE engine with two?wheel drive models only) 10 Electronic throttle control system 8 AMP 30 Car audio system 9 MAIN 30 Starting system, "AM2" fuse 10 DOME 15 Car audio system, clock, personal lights, interior light, trunk light, open door warning light, wireless remote control system 11 HORN 10 Horn 12 HAZARD 10 Emergency flashers, turn signal lights 13 EFI 15 Multiport fuel injection system/sequential multiport fuel injection system, emission control system, "EFI" fuse 14 ALT?S 5 Charging system 15 HEAD LH LWR 10 Left?hand headlight (low beam) 16 HEAD RH LWR 10 Right?hand headlight (low beam) 17 EFI2 (1ZZ?FE engine with two? wheel drive models only) 15 Multiport fuel injection system/ sequential multiport fuel injection system, emission control system 18 TAIL 15 Tail lights, license plate lights, instrument panel lights, instrument cluster lights, clock 19 OBD 7,5 On?board diagnosis system 20 WIPER 25 Windshield wipers 21 AM2 15 Charging system, multiport fuel injection system/sequential multiport fuel injection system, starting system, SRS airbag system 22 STOP 15 Stop lights, high mounted stoplight, anti?lock brake system, shift lock control system, multiport fuel injection system/sequential multiport fuel injection system, cruise control system 23 DOOR 25 Power door lock system, glass hatch opener switch 24 AM1 25 "CIG" fuse 25 ECU?IG 10 Electric cooling fan, anti?lock brake system, traction control system, vehicle stability control system, brake assist system, shift lock control system, cruise control system 26 RR WIPER 15 Rear window wiper 27 A/C 10 Air conditioning system 28 INV 15 Power outlet (115 VAC) 29 P/POINT 15 Power outlet (12 VDC/ in the rear console box) 30 ECU?B 10 Daytime running light system 31 CIG 15 Power outlet (on the instrument panel) or cigarette lighter, car audio system, clock, power rear view mirror control, shift lock control system 32 GAUGE 10 Gauges and meters, air conditioning system, daytime running light system, charging system, auto anti?glare inside rear view mirror, power windows, cruise control system, rear window defogger, back?up lights, front passenger's seat belt reminder light 33 WASHER 15 Windshield washer, rear window washer 34 M?HTR/DEF I?UP 10 Engine control system

Fuses (type B)

Fuse Ampere rating Description 35 ABS NO.1 30 Anti?lock brake system, vehicle stability control system, traction control system, brake assist system 36 RDI FAN 30 Electric cooling fan 37 ABS NO.2 40 (without vehicle stability
control system) Anti?lock brake system 50 (with vehicle stability
control system) Anti?lock brake system, vehicle stability control system, traction control system, brake assist system 38 HEAD MAIN 40 "HEAD LH UPR", "HEAD RH UPR", "HEAD LH LWR" and "HEAD RH LWR" fuses 39 AIR PUMP 50 (1ZZ?FE engine with four?wheel drive models and 2Z ?GE engine only) Emission control system 40 HTR 40 Air conditioning system 41 DEF 30 Rear window defogger, "M?HTR/DEF I?UP" fuse 42 POWER 30 Power windows, electric moon roof

Fuses (type C)

Fuse Ampere rating [A] Description 43 ALT 100 Charging system, "ABS NO.1", "ABS NO.2", "RDI FAN", "FOG", "HTR", "AM1", "POWER", "DOOR", "ECU?B", "TAIL", "STOP", "P/POINT", "INV" and "OBD" fuses WARNING: Terminal and harness assignments for individual connectors will vary depending on vehicle equipment level, model, and market.
0helpful
1answer

Where to find CODE if I know code no. radio audio 10\30.

Turn radio on or turn ignition on - radio will show a number of lines on screen. enter code with numbers pad one code number at a time until next flashing bar opens and wait 10-20 seconds. If failed start procedure from scratch.
1helpful
1answer

How to find fuse boxs

FUSE PANEL LOCATION
The fuse panel is located in the engine compartment. A label on the inside of the cover lists the fuse amperage and circuits protected.
volvo 850 fuses fuse panel layout service repair manual
FUSE PANEL IDENTIFICATION
Fig. 1: Fuse Panel Identification
Courtesy of Volvo Cars of North America.
WARNING: Always disconnect battery ground cable before servicing "high-current fuses. It is recommended that "high-current" fuses be replaced by a qualified technician.
* 1 - 15 Amp
Fuel Injection, Distributor Ignition, Automatic Gearbox
* 2 - 15 Amp
Fuel Pump, Alarm System
* 3 - 10 Amp
Courtesy Lights, Oil Level Sensor
* 4 - Not Used (1993-95)
* 4 - 10 Amp (1996)
Electronic Start Inhibitor (Immobilizer)
* 5 - 30 Amp
ECC Blower (Speed 4)
* 6 - 25 Amp
Central Locking System, Alarm
* 7 - 15 Amp
Audio System (Amplifier)
* 8 - 25 Amp (1993-95)
Power Antenna, Trailer Connector
* 8 - 40 Amp (1996)
Electronic Start Inhibitor (Immobilizer)
* 9 - 30 Amp
ABS, Traction Control System
* 10 - Not Used (1993-95)
* 10 - 15 Amp (1996)
Heated Rear Seat (If Equipped)
* 11 - 30 Amp
Heated Rear Window & Side Mirrors
* 12 - 10 Amp
Brake Lights
* 13 - 15 Amp
Hazard Flashers, Headlight Flashers, Alarm
* 14 - 30 Amp
ABS, Traction Control System
* 15 - 10 Amp (1993-95)
Audio System, Courtesy Lights, Door Open Light, Trunk Light, Glove Box Light, Remote Control Central Locking System,
Oil Level Sensor, Seat Belt Reminder
* 15 - 10 Amp (1996)
Audio System, Courtesy Lights, Door Open Light, Trunk Light, Glove Box Light, Remote Control Central Locking System,
Oil Level Sensor, Seat Belt Reminder, Data Link Connector
* 16 - 30 Amp (1993-95) Accessories
* 16 - 30 Amp (1996)
Power Antenna, Trailer Connector, Accessories
* 17 - 10 Amp
Key Reminder
* 18 - 25 Amp (1993-95)
Heated Front Seats, Power Mirrors
* 18 - 15 Amp (1996) Front Fog Lamps
* 19 - 15 Amp
Left High Beam Headlight
* 20 - 15 Amp
Right High Beam Headlight, High Beam Indicator
* 21 - 15 Amp
Left Low Beam Headlight
* 22 - 15 Amp
Right Low Beam Headlight
* 23 - 10 Amp
Left Parking Light, License Light
* 24 - 10 Amp
Right Parking Light, Bulb Failure Warning Sensor
* 25 - 10 Amp
Rear Fog Lamps, Fog Lamp Indicator
* 26 - Not Used (1993-95)
* 26 - 25 Amp (1996)
Heated Front Seats, Power Mirrors
* 27 - 15 Amp
Back-Up Lights, Turn Signals
* 28 - 10 Amp
Cruise Control, Heated Rear Window, Seat Belt Reminder Light, Shiftlock, Bulb Failure Warning Sensor, Heated Rear Seat
* 29 - 15 Amp
ABS, Traction Control System
* 30 - 10 Amp
Cigarette Lighter
* 31 - 25 Amp
ECC, ECC Blower (Speeds 1-3)
* 32 - 10 Amp
Audio System, Remote Controlled Central Locking System
* 33 - 15 Amp (1993-95)
Power Seats, OBD Test Socket, Tailgate Washer/Wipe (Wagon)
* 33 - 15 Amp (1996)
Power Seats, Tailgate Washer/Wipe (Wagon)
* 34 - 25 Amp
Windshield Wiper/Washer, Horn, Headlight Washer/Wiper
* 35 - 10 Amp
Instrument Lights, Sun Roof, Traction Control System
* 36 - Not Used
* 37 - Circuit Breaker
Power Windows, Power Sun Roof
* 38 - Not Used
* 39 - Circuit Breaker
Drivers Power Seat
* 40 - Circuit Breaker
Passengers Power Seat
RELAY PANEL LOCATION
The relay panel is located at the left corner of the instrument panel.
i copied this off a volvo site Hope this helps
0helpful
1answer

Rpm won't go over 4000 and will not do over 30 mph

2002 GMC Envoy Car Stereo Wiring Chart
Car Radio Battery Constant 12v+ Wire: Orange
Car Radio Accessory Switched 12v+ Wire: The radio harness does not provide a switched power source. Run a wire to the fusebox or ignition switch harness for switched power.
Car Radio Ground Wire: Black/White
Car Radio Illumination Wire: N/A
Car Stereo Dimmer Wire: N/A
Car Stereo Antenna Trigger Wire: N/A
Car Stereo Amp Trigger Wire: N/A
Car Stereo Amplifier Location: N/A
Car Audio Front Speakers Size: N/A
Car Audio Front Speakers Location: N/A
Left Front Speaker Positive Wire (+): Tan
Left Front Speaker Negative Wire (-): Gray
Right Front Speaker Positive Wire (+): Light Green
Right Front Speaker Negative Wire (-): Dark Green
Car Audio Rear Speakers Size: N/A
Car Audio Rear Speakers Location: N/A
Left Rear Speaker Positive Wire (+): Brown
Left Rear Speaker Negative Wire (-): Yellow
Right Rear Speaker Positive Wire (+): Dark Blue
Right Rear Speaker Negative Wire (-): Light Blue
3helpful
2answers

Need fuse panel layout for ford f150

I don't know if this will help but here are the position by numbers. I have the whole owners manual that I can send as a PDF if you want. Hope this helps. Good luck

Fuses

Position Amps Description

1 20 Trailer tow back-up and tail lamps

2 10 Air bag diagnostic monitor

3 15 Power locks

4 15 Air suspension

5 20 Horn

6 15 Audio system

7 15 Parking and tail lamps

8 30 Headlamps

9 15 Daytime running lamps and fog lamps

10 25 Auxiliary power point

11 - Not used

12 - Not used

13 - Not used

14 60/20 4WABS/rear anti-lock brake

15 50 Air suspension compressor

16 40 Trailer tow battery charge and stop/turn lamps

17 30 4WD transfer case shift motor and clutch

18 30 Driver power seat

19 20 Fuel pump

20 50 Instrument panel fuse panel ignition switch feed

21 50 Instrument panel fuse panel ignition switch feed

22 50 I/P fuse panel battery feed

23 40 I/P blower

24 30 PCM power

25 30 Power windows

26 - Not used

27 - Not used

28 30 Trailer tow electronic brake

29 - Not used

Relays

Position Description

1 Windshield wipers HI/LO speed

2 Windshield wipers run/park relay

3 Washer pump relay

4 Fuel pump relay

5 Horn relay

6 PCM power relay

8helpful
5answers

Need master code for radio in a 2000 ml320

Hi,

Regretfully due to reasons of theft or piracy we do not pass the radio codes here at FixYa. If you contact your local Mercedes-Benz dealer they will give you the 5 digit code. (You must have your registration and know the complete serial number of the radio)

Kelly
0helpful
1answer

How do you reset the cd audio system

disconect the battery wait 30 secs

re conect bat all settings reset to factory
0helpful
1answer

I have a 1999 honda odyssey, the radio needs to have the reset number put in, but it says radio err.. anyway to reset it so i can put in the code??

yes if you have the code and the display reads error then you need to reset the audio unit. to reset you can disconnect the neg and pos battery cables hold them so they are touching each other for approx 30 seconds. reinstall cables and the error message on the audio unit sounds be cleared and you can now enter you code. if it still reads error then there may be internal damage to the audio unit- hope this helps
Not finding what you are looking for?

77 views

Ask a Question

Usually answered in minutes!

Top Mercedes-Benz Experts

ZJ Limited
ZJ Limited

Level 3 Expert

17989 Answers

xxxxxx xxx

Level 3 Expert

5117 Answers

Arnie Burke
Arnie Burke

Level 3 Expert

7339 Answers

Are you a Mercedes-Benz Expert? Answer questions, earn points and help others

Answer questions

Manuals & User Guides

Loading...